Authors: Daryl Tan, Jeff Gan, Jothinandan Pillay, Lin Dehui, Shune Lei
Team: CS2103-AY1819S2-W10-2
Since: January 2019 License: MIT
- 1. Introduction
- 2. Background Information
- 3. Before We Begin
- 4. Features
- 4.1. Viewing help :
help - 4.2. Date Feature in Pocket Project
- 4.3. Adding an employee or project to the application:
add - 4.4. Add an employee/milestone/project task/user story to a project :
addto - 4.5. Delete a project or an employee from the application
delete - 4.6. Remove an employee/milestone/project task/user story from a project :
removefrom - 4.7. Edit an employee/project in the application :
edit - 4.8. Locating employees, projects or skills by name:
find - 4.9. Update a user story/project task status:
update - 4.10. Listing all employees or projects in application :
list - 4.11. View the details of employees or projects :
view - 4.12. To indicate the project has been completed :
complete - 4.13. Display statistics regarding the projects :
stats - 4.14. Undoing previous command :
undo - 4.15. Redoing the previously undone command :
redo - 4.16. Clearing all entries :
clear - 4.17. Exiting the program :
exit - 4.18. Saving the data
- 4.19. Sort the projects by name or deadline :
sort[coming in v2.0] - 4.20. Encrypting data files
[coming in v2.0] - 4.21. Project commands
[coming in v2.0]
- 4.1. Viewing help :
- 5. FAQ
- 6. Command Summary
1. Introduction
Pocket Project is primarily an application for software engineering project managers who are currently in-charge of a team of large employees and many projects. This application employs the use of a Command Line Interface(CLI) to easily navigate through the application which contributes to the efficiency and user-friendliness of the end product. This application allows managers to keep track of all the employees and their related background information such as their GitHub account username and relevant skills.
Additionally, it also helps to keep track of all the projects that the manager is currently involved with and key details of the project such the client, deadline and milestones can also be stored. Through the combination of the two main components, the application allows the storing and viewing of all the employees working on particular project and all the projects currently under a single employee among other functionalities.
2. Background Information
When first seeing our application, many of you may wonder what is the significance behind this project. Well, the current issues cannot be seen at the surface level and requires a deeper look. To present all the information in a nutshell, our application provides everything that a manager will ever need at the tip of his fingertips. Being able to better handle project and man management leads to a more organized workflow and inevitably, a more productive environment which can set a strong foundation for the lifecycle of various projects.
In addition, the inability to track the progress of a project has been cited as one of the top reasons as to why a product fails, and thus our application aims to potentially solve this problem by having both a milestones feature and a task manager to mainly see not only what has been completed, but also the proposed schedule for the weeks ahead until the project is due for completion.
3. Before We Begin
This section will outline key things to take note of before reading the user guide. The information provided in this section will be useful in understanding certain symbols and terms used further on in the user guide.
3.1. Quick Start
-
Ensure you have Java version
9or later installed in your Computer. -
Download the latest
pocketproject.jarhere. -
Copy the file to the folder you want to use as the home folder for your Pocket Project.
-
Double-click the file to start the app. The GUI should appear in a few seconds as shown below.
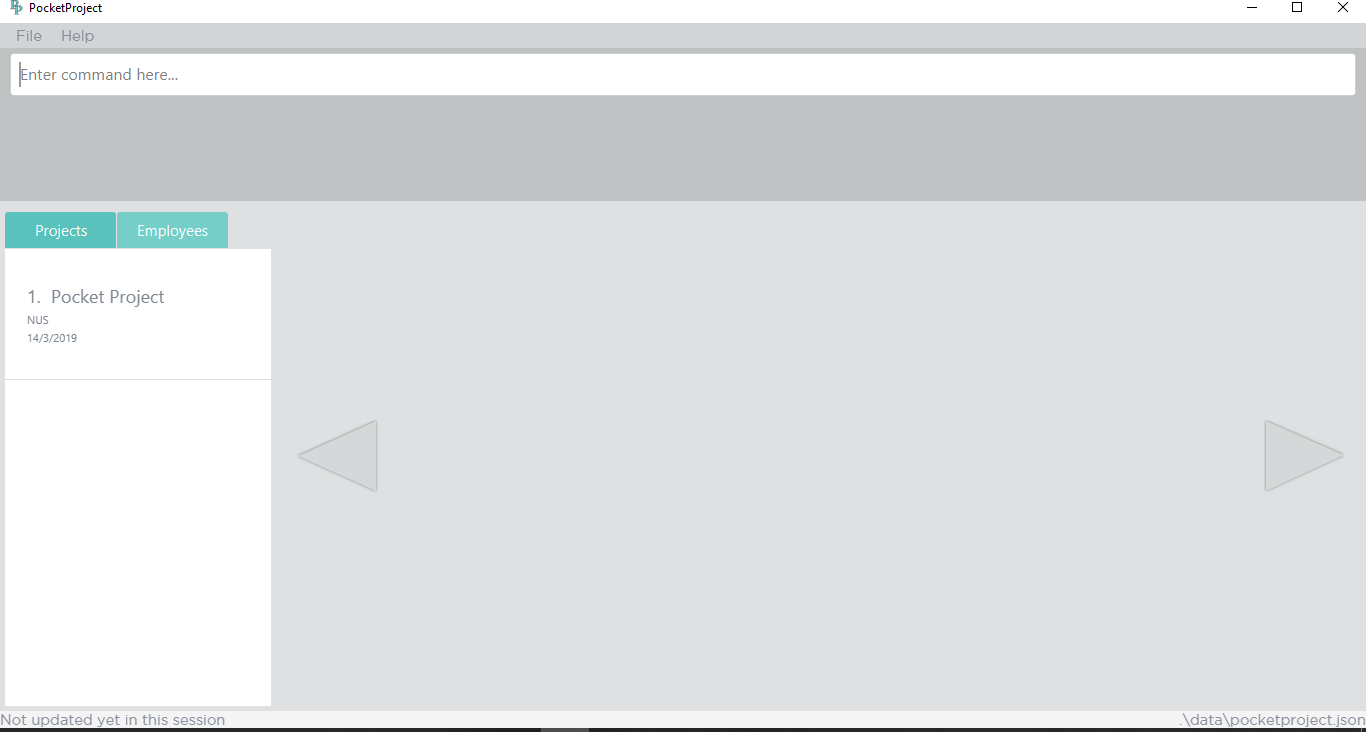 Figure 1. Pocket Project UI
 -
Type the command in the command box and press Enter to execute it.
e.g. typinghelpand pressing Enter will open the help window. -
Some example commands you can try:
-
list employee: lists all employees -
addn/John Doe p/98765432 e/johnd@example.com g/mainmanjohn: adds an employee namedJohn Doeto the Pocket Project. -
delete employee3: deletes the 3rd employee shown in the current list -
exit: exits the app
-
-
Refer to Section 4, “Features” for details of each command.
3.2. Navigating the interface
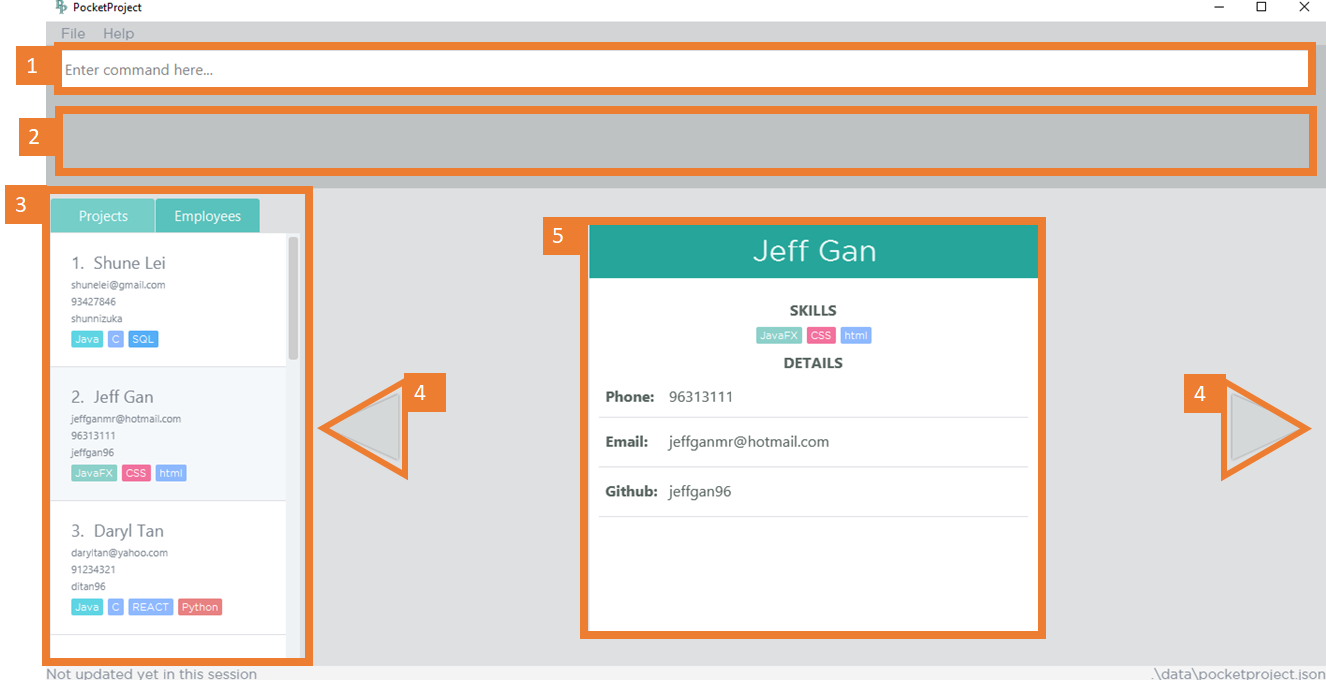
As shown above, there are 5 main components in Pocket Project interface:
-
Command Box: where you key in the command
-
Result Box: show the result of the command that is keyed in
-
Side tab Panel: display either project list or employee list
-
Prev/Next Button: to navigate through the project/employee details
-
Detail panel: display details of an employee/project
There are several detail panels to display the details of the employees and the projects as shown below. You can toggle between these panel by using the Prev/Next Button.

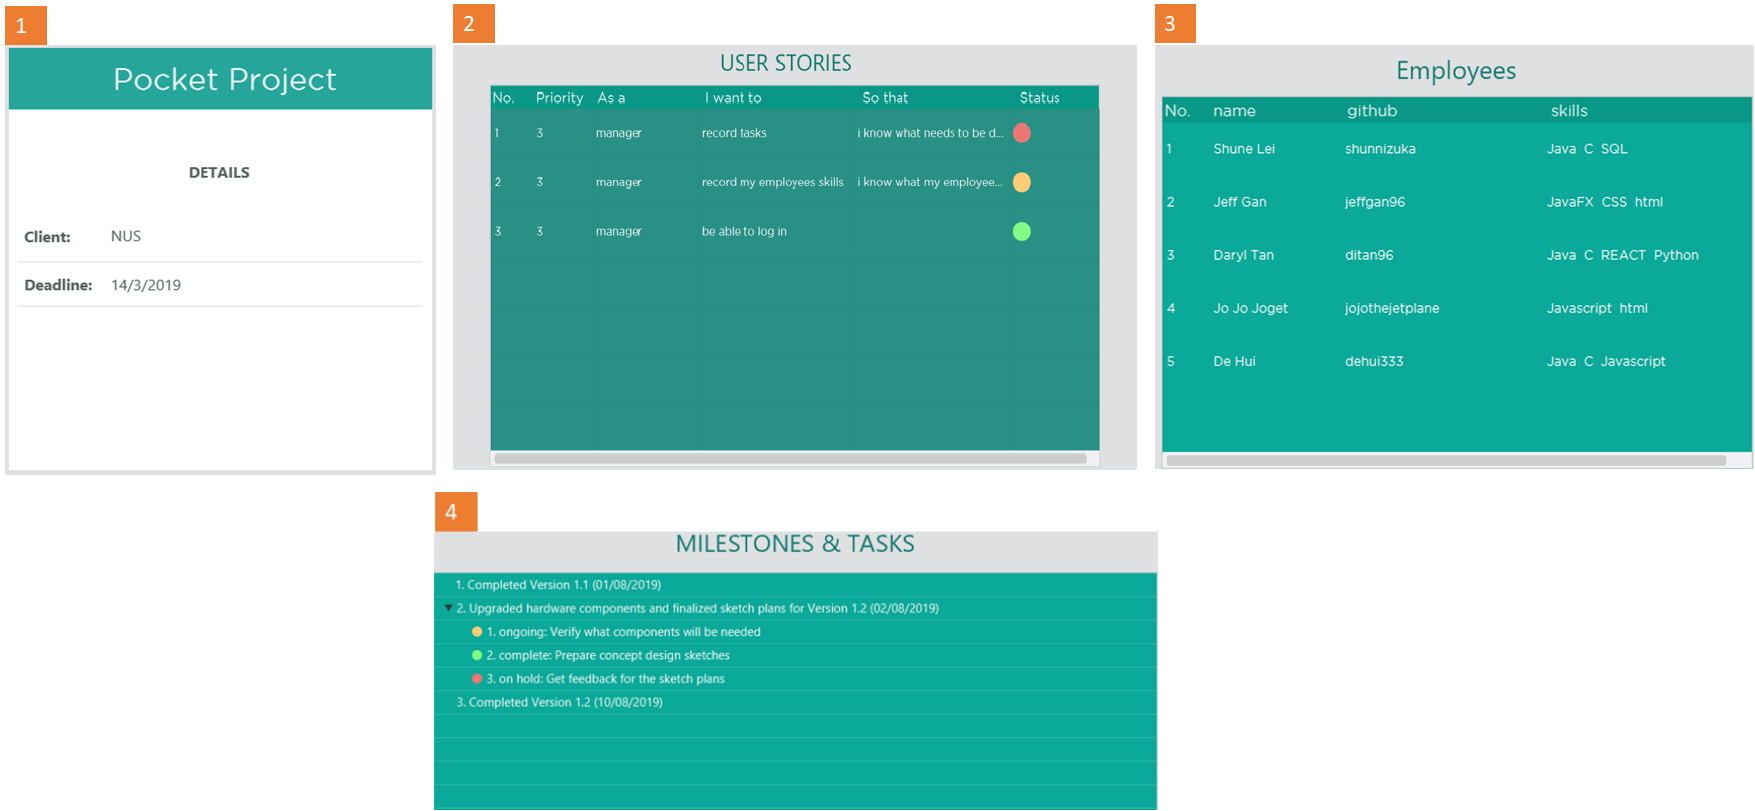
3.3. Colour coding
There are several common colours used throughout Pocket Pocket to denote the statuses of events. As shown below, there are 3 main colours used:
-
Red: The event is put on hold.
-
Amber: The event is currently ongoing.
-
Green: The event is completed.

3.4. Symbols
The following section details and previews a few legends that will be used throughout the user guide. These legends are used to represent special information such as tips and warnings.
| Symbol | Meaning |
|---|---|
|
The note pad icon indicates any useful tips or things that you need to take note of while using the Pocket Project application. |
|
The light bulb icon indicates any shortcuts that you can use while using the Pocket Project application. |
|
The exclamation mark icon indicates any warnings that you can take note of while using the Pocket Project application. |
|
The graduation cap icon indicates any advanced usages or extra technical information about how a particular command works should you be interested to know. |
3.5. Format of Commands
This section introduces to you the format of commands that are used in Pocket Project.
| Command Format | Meaning | Example | Remark |
|---|---|---|---|
Upper Case |
Parameters supplied by User |
|
|
Square Brackets |
Optional inputs |
|
|
|
Can be used multiple times |
|
Can have multiple skills: |
|
Parameters can be in any order e.g. if the command specifies
|
3.6. Glossary
This section details a few key terms that are used through the course of the User Guide.
| Term | Meaning |
|---|---|
Alphanumeric |
Only contains either digits (0-9) or letters of the English alphabet (A-Z). |
Command Line Interface (CLI) |
A means of interacting with a computer program where the user issues commands to the program in the form of successive lines of text. |
Lexicographic |
Ordering of words based on how it would appear in a dictionary. |
Milestone |
A key event that is completed during the entire timeline of the project. |
Regex |
Short-form for regular expression. A regular expression is used to check if a given input matches the prescribed pattern or format. |
One-Based Indexing |
Way of numbering in which the initial element of a sequence of elements is assigned the index 1. |
User Story |
Used primarily for planning of a feature in a project or application. The user story describes the type of user, what they want, why and the importance/significance of the feature |
Zero-Based Indexing |
Way of numbering in which the initial element of a sequence of elements is assigned the index 0. |
4. Features
The following section will outline the various features and commands available to you and will outline how the various commands can be used through examples and illustrations.
4.1. Viewing help : help
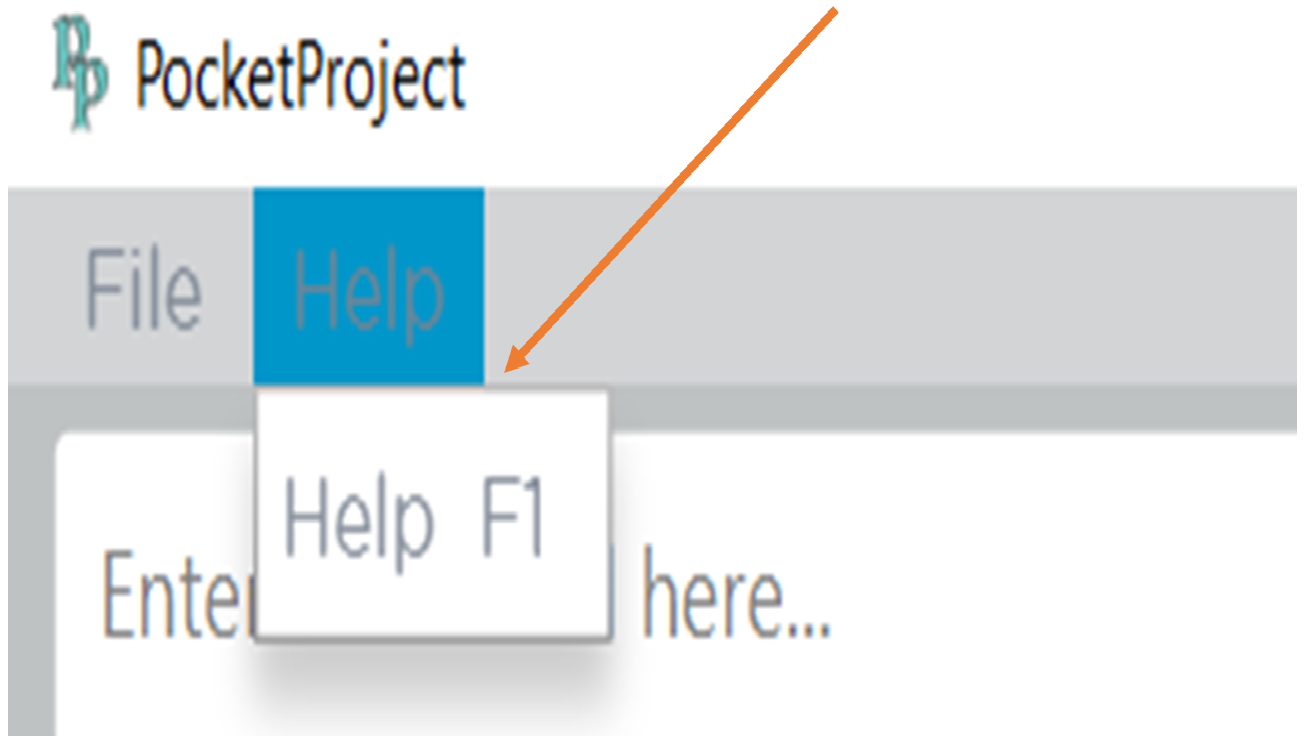
You can open up the User Guide from the Pocket Project application by calling the help command.
Format: help
|
Alternatively, you can press F1
or click |
4.2. Date Feature in Pocket Project
Whenever a particular command requires a date field, you can choose to use either of the below mentioned formats.
4.2.1. Fixed Date Format
You can input a date using the fixed date format.
Format: DD/MM/YYYY
Examples:
1. 23/12/2019
2. 09/03/2020
|
The year field will not accept values beyond the
year |
4.2.2. Flexible Date Format
Alternatively, you can also input a date using the flexible date format. The flexible date format allows you to give an input with relation to the current date. It supports the below mentioned 3 formats.
Choosing a date relative to the current day
You can key in today,tomorrow and yesterday to get today’s, tomorrow’s and
yesterday’s date respectively.
Format: today/tomorrow/yesterday
Choosing a date relative to the current week
You can also aim to choose a date with relation to the current week.
Format: this/next/last week DAY_OF_WEEK
|
The |
Examples:
1. next week 7
This would select next week’s Sunday as the target date.
2. last week 2
This would select last week’s Tuesday as the target date.
You can refer to the screenshots of the program below for a clearer picture. Assume that the
current date is 12 April 2019 (12/04/2019), Friday. It will be demonstrated using the add project command which requires
a s/START_DATE and a d/DEADLINE.
![][width="500"](images/ug-dateweek.png)
Choosing a date relative to the current month
You can also aim to choose a date with relation to the current week.
Format: this/next/last month DAY_OF_MONTH
|
The |
Examples:
1. this month 24
This would select the current month’s 24th day as the target date.
2. next month 17
This would select next month’s 17th day as the target date.
|
You do not need to specify which format you are planning to use and the application is able to differentiate it based on the input received. |
Some additional information
The application will also automatically help to check the validity of the target
date. Should you accidentally target an invalid dates such as 31/04/2019, it will be rejected as the month of April
only has 30 days. Additionally, leap years are also considered. So, as 2020 is a leap year, 29/02/2020 is considered a valid input but 29/02/2019 will be rejected
as 2019 is not a leap year.
4.3. Adding an employee or project to the application: add
4.3.1. Adding an employee to the application: add employee
You can add an employee to the Pocket Project when a new employee joins the company/team so that the key details of the employee are stored in the application and projects can be assigned to them in the future.
Format: add employee n/NAME p/PHONE_NUMBER e/EMAIL g/GITHUB_ACCOUNT_USERNAME [s/SKILL]…
Examples:
-
add employee n/John Doe p/98765432 e/johnd@example.com g/johnballer s/Java -
add employee n/Betsy Crowe e/betsycrowe@example.com g/BetBet p/98228312
|
An employee can have any number of skills (including 0). |
You can refer to the screenshot below to have a clearer picture of how it works and looks like.
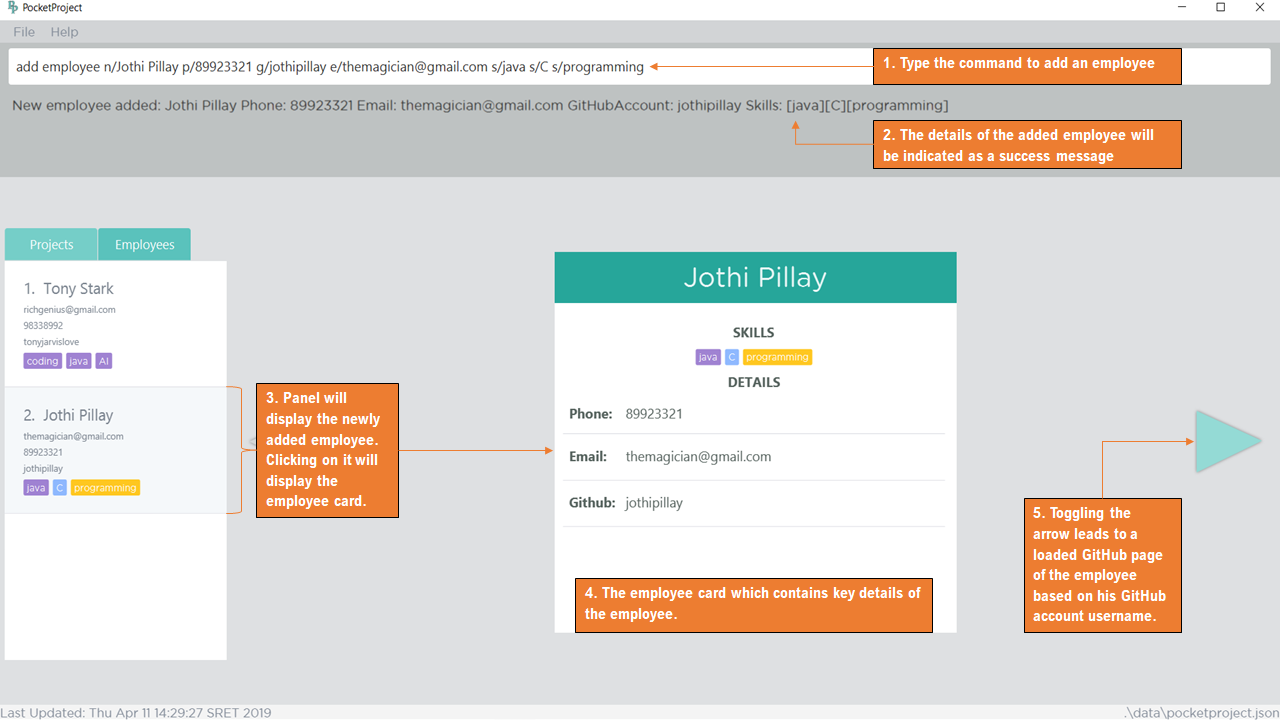
In addition, as a software engineering project manager, you may want to easily access an employee’s GitHub repository to possibly monitor his progress on a particular project. Thus for ease of use, you can simply toggle the arrow as shown above in Step 5 of Figure 5 and the GitHub repository of the employee will be viewable and accessible in the details panel.
|
A working Internet connection is required to see and navigate through the GitHub repository. Otherwise, the page will not load. |
|
You can also view the list of all projects assigned to the employee by toggling the arrows on the details panel. |
4.3.2. Add a project to the application: add project
You can add a project to the Pocket Project when the team takes on a new project so that key details of the project are stored and employees, milestones, tasks and user stories can be assigned to them in the future.
The project has a default description when created and this can be
edited using the edit project info command.
Format: add project n/NAME c/CLIENT_NAME s/START_DATE d/DEADLINE
|
The deadline of the project should minimally be 1 day after the start of a project. |
Examples:
1. add project n/Apollo s/10/03/2019 d/12/12/2019 c/FairPrice
2. add project n/Xtreme c/John Smith s/09/02/2020 d/13/04/2020
You can refer to the screenshot below to have a clearer picture of how it works and looks like.
![][width="500"](images/ug-addproject.png)
|
You can also view the list of all employees currently working on the project, a list of milestones and tasks, and a list of user stories by toggling the arrows on the details panel. |
4.4. Add an employee/milestone/project task/user story to a project : addto
|
Note that 'milestone', 'userstory', 'projecttask' are reserved words so they are not accepted as part of the argument for the description of respective components |
4.4.1. Add an employee to a project: addto employee
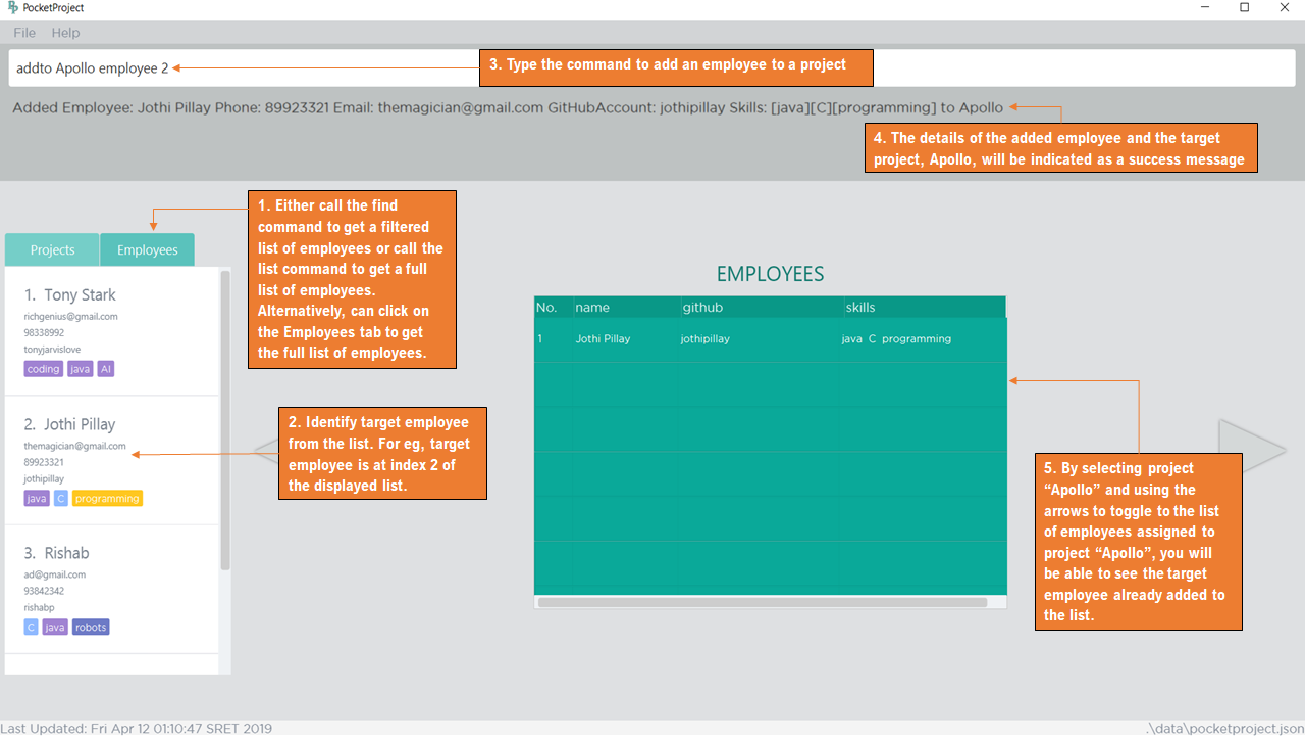
You can add an employee to any projects already created in the Pocket Project application. You can
do this by first listing all employees using the basic list employees command or by first filtering all the
employees with the find employee or find skills command, and then choosing the index of the employee
in the displayed list.
Format: addto PROJECT_NAME employee EMPLOYEE_INDEX
The employee at the specified EMPLOYEE_INDEX is added to the project specified by the PROJECT_NAME.
|
The index refers to the serial number (one-based indexing) shown in the displayed list of employees. |
|
The |
Examples:
-
list employeestechnique-
list employees
lists all the employees in the application. -
addto Apollo employee 2
Adds the 2nd person in the displayed employee list to project "Apollo".
-
-
find employeetechnique-
find employee John Han
The displayed list will be filtered to show all employees whose names contain John, Han (not case sensitive). -
addto Apollo employee 5
Adds the 5th person in the displayed filtered employee list to project "Apollo".
-
You can refer to the screenshot below to have a clearer picture of how it works and looks like.
|
As shown in the figure above, instead of calling
the |
4.4.2. Add a milestone to a project: addto milestone
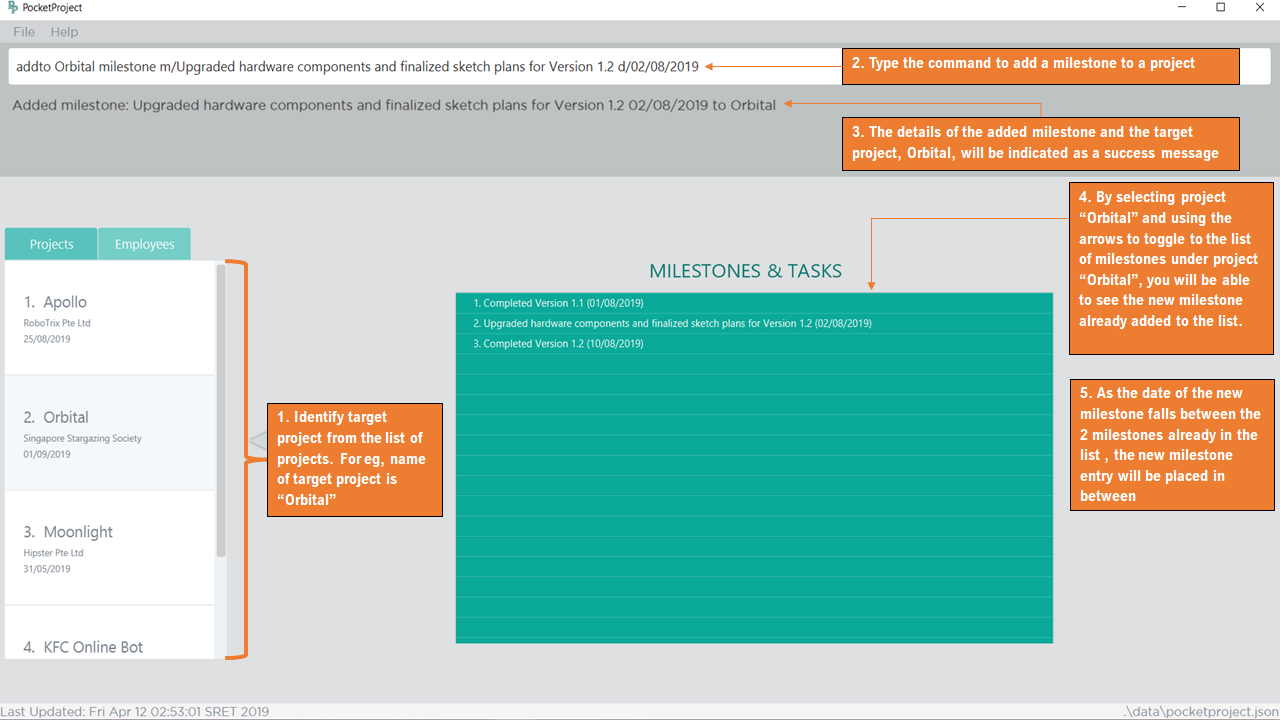
You can add a milestone to any projects already created in the Pocket Project application. Milestones are typically key events that are completed during the entire timeline of the project. Once a milestone is created, project tasks can be assigned to it.
Format: addto PROJECT_NAME milestone m/MILESTONE_DESC d/MILESTONE_DATE
|
Both the fixed date format and the flexible date format
can be used to select the target |
|
As the milestone is part of a project’s timeline, the
|
Examples:
-
addto Apollo milestone m/Completed UI for program d/23/11/2015
The milestone with the given description and the date 23/11/2015 will be added to the list of milestones in project "Apollo". -
addto Orbital milestone m/Version 1.3 Complete d/todayThe milestone with the given description and today’s date will be added to the list of milestones in project "Orbital".
|
The list of milestones inside the target project will automatically be sorted by its date every time a new entry is added. |
You can refer to the screenshot below to have a clearer picture of how it works and looks like.
4.4.3. Add a project task to a project’s milestone: addto projecttask
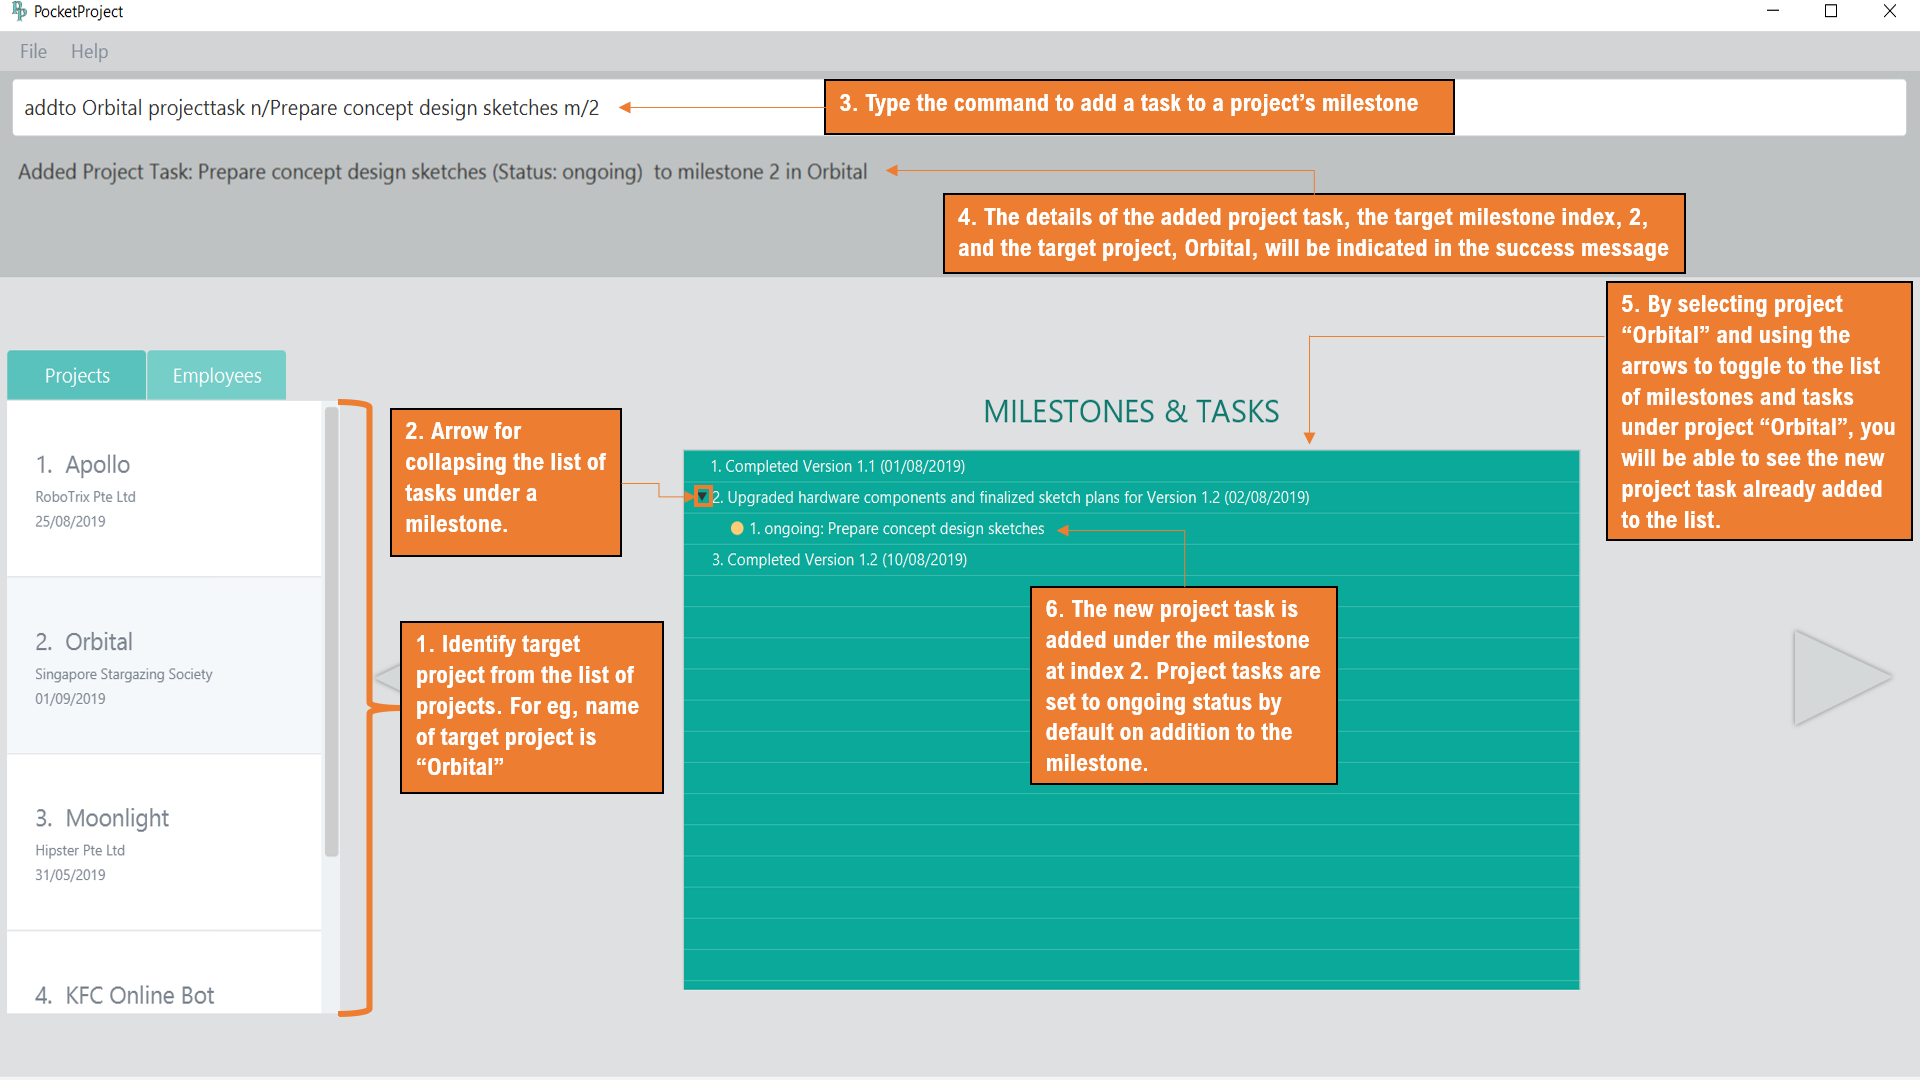
Building further on the functionality of milestones, you can also add project tasks to existing milestones in Pocket Project. This allows you to track and plan out in more detail what needs to be done between each milestone.
Format: addto PROJECT_NAME projecttask n/PROJECT_TASK_DESCRIPTION m/MILESTONE_INDEX
|
The |
Examples:
-
addto Apollo projecttask n/Create feature XYZ m/1
A project task with the given description will be added to the list of tasks under the milestone at index 1 in project "Apollo". -
addto Orbital projecttask m/2 n/Prepare concept design sketches
A project task with the given description will be added to the list of tasks under the milestone at index 2 in project "Orbital".
|
There is no specific order for either the project task name or the milestone index when entering the command so either way is acceptable. |
You can refer to the screenshot below to have a clearer picture of how it works and looks like.
|
Clicking on the arrow beside a milestone containing existing tasks allows you to hide the list of tasks under the milestone. |
4.4.4. Add a user story to a project: addto userstory
You can add a user story to a project. User stories are tools used in software development to capture a description of a software feature from an end-user perspective.
Format: addto PROJECT_NAME userstory i/STORY_IMPORTANCE STORY
|
|
|
|
Examples:
-
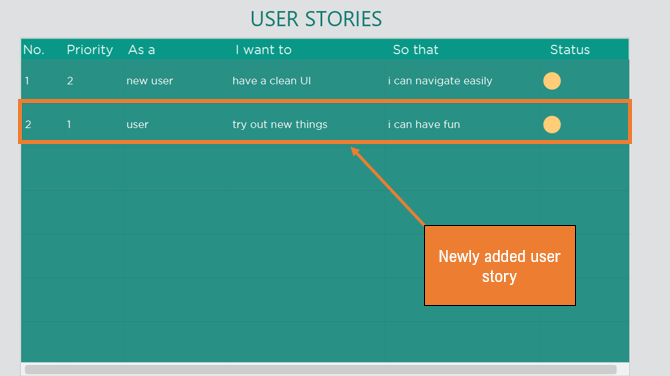
addto Apollo userstory as a new user i want to have a clean UI so that i can navigate easily i/2 -
addto Apollo userstory i/1 as a user i want to try out new things so that i can have fun
|
You can input the importance level or the actual user story in any order. |
|
A valid user story can also be simply: E.g |
Upon a successful addition of a user story, you should be able to see the new user story in the list of user stories. You may need to toggle the buttons to get to the correct panel.
Refer to the screenshot below to see how the new user story is shown.
4.5. Delete a project or an employee from the application delete
4.5.1. Delete a project from the application: delete project
Deletes a project from the list of projects.
Format: delete project PROJECT_NAME or delete project PROJECT_INDEX
![]() Deletes the project at the specified
Deletes the project at the specified PROJECT_INDEX.
The index refers to the index number (one-based) shown in the displayed list of projects.
 The index must be a positive integer and cannot be larger than the size of the list. The
 PROJECT_NAME must be the name
of an existing project.
Examples:
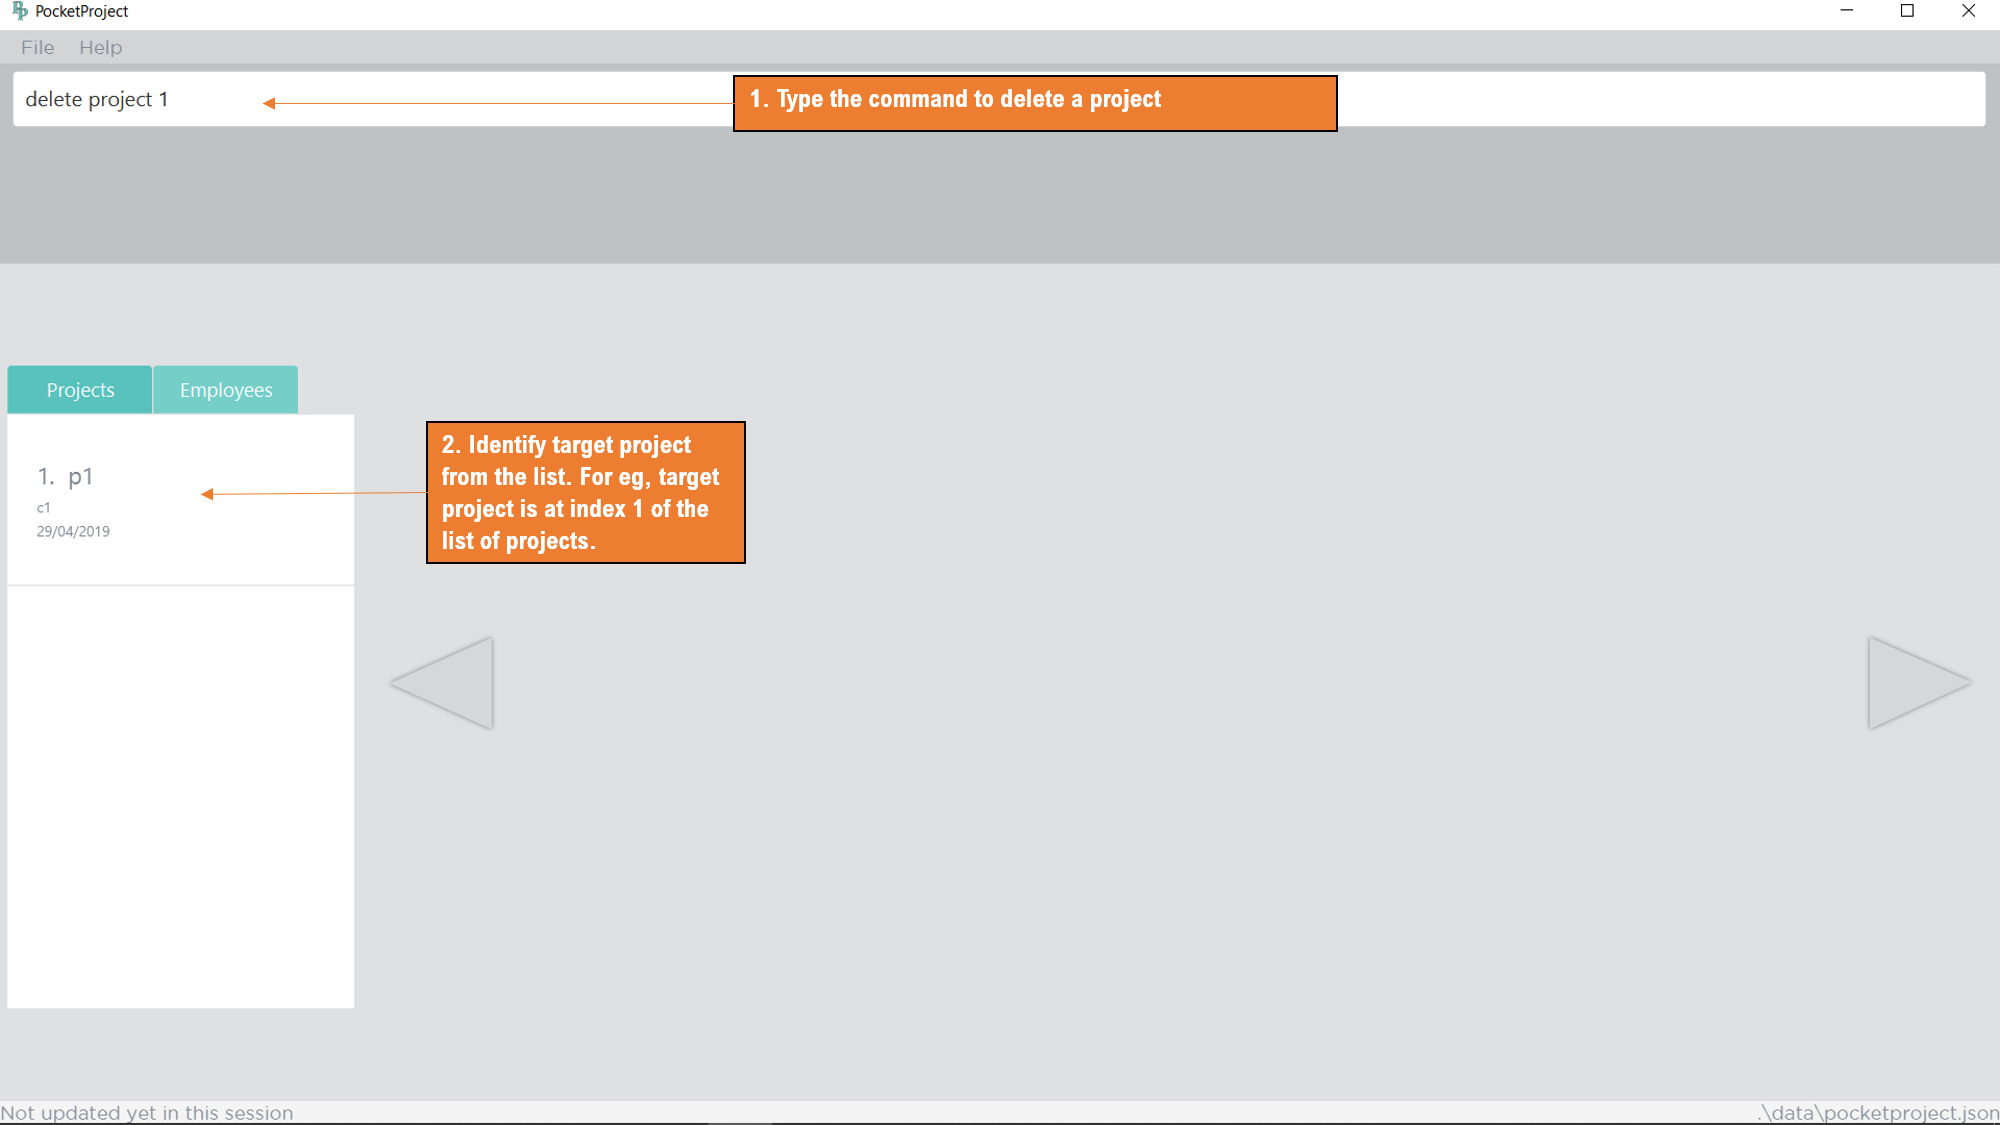
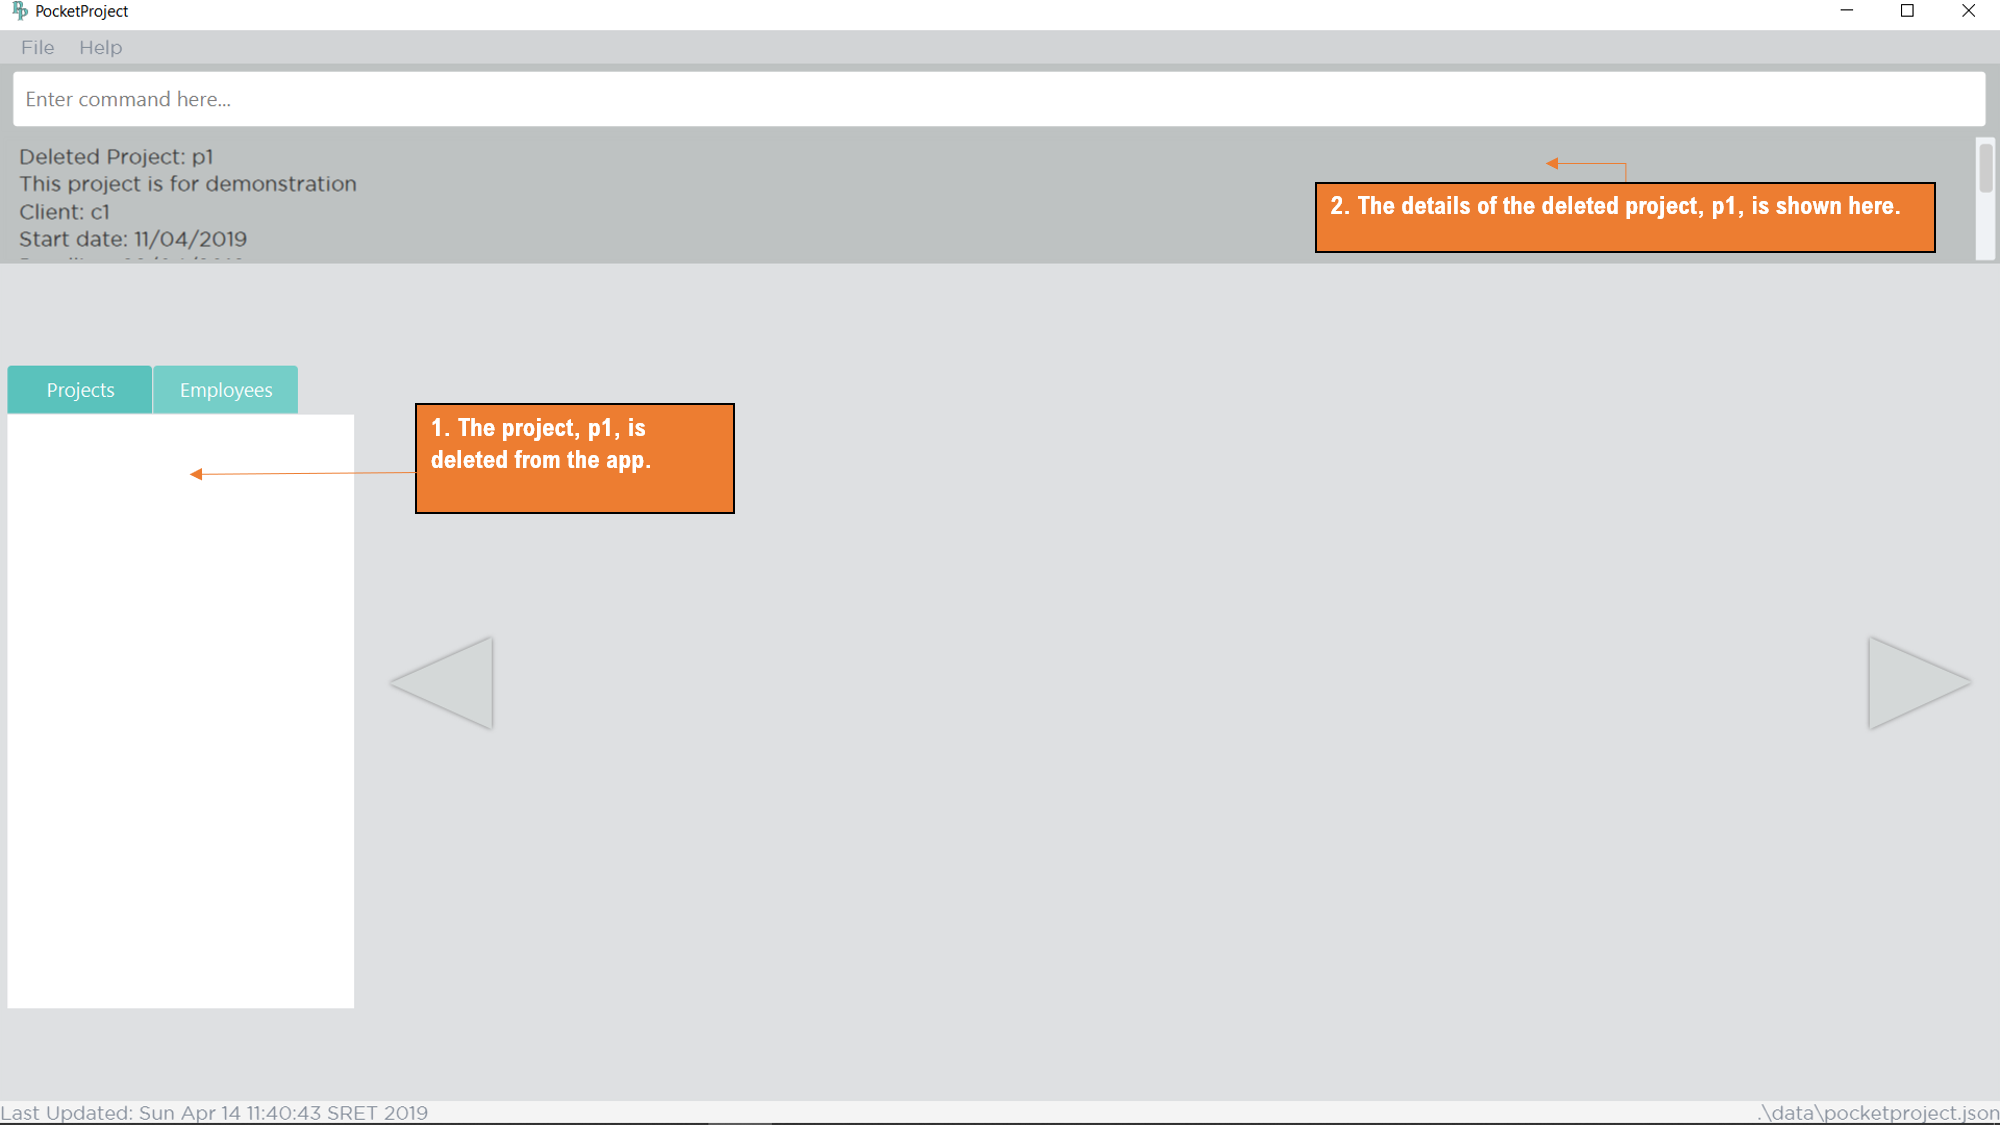
-
delete project 1
Deletes the first project shown in the most recent displayed list of projects. The first figure above shows the command being typed but not entered yet and the second shows the effect of the command.
4.5.2. Delete an employee from the application: delete employee
Deletes the specified employee from the employee list.
Format: delete employee INDEX
Examples:
-
list employees
delete employee 2
Deletes the 2nd person in the displayed employee list. -
find employee Betsy
delete employee 1
Deletes the 1st person in the resultant employee list shown by thefindcommand.
![]() Either the
Either the list employee command or the find employee command needs to be invoked
before calling the delete employee command as the index is referenced from the last returned list
of employees.
4.6. Remove an employee/milestone/project task/user story from a project : removefrom
4.6.1. Remove an employee from a project: removefrom PROJECT_NAME employee
Removing an employee from a project.
Format: removefrom PROJECT_NAME employee EMPLOYEE_INDEX
Examples:
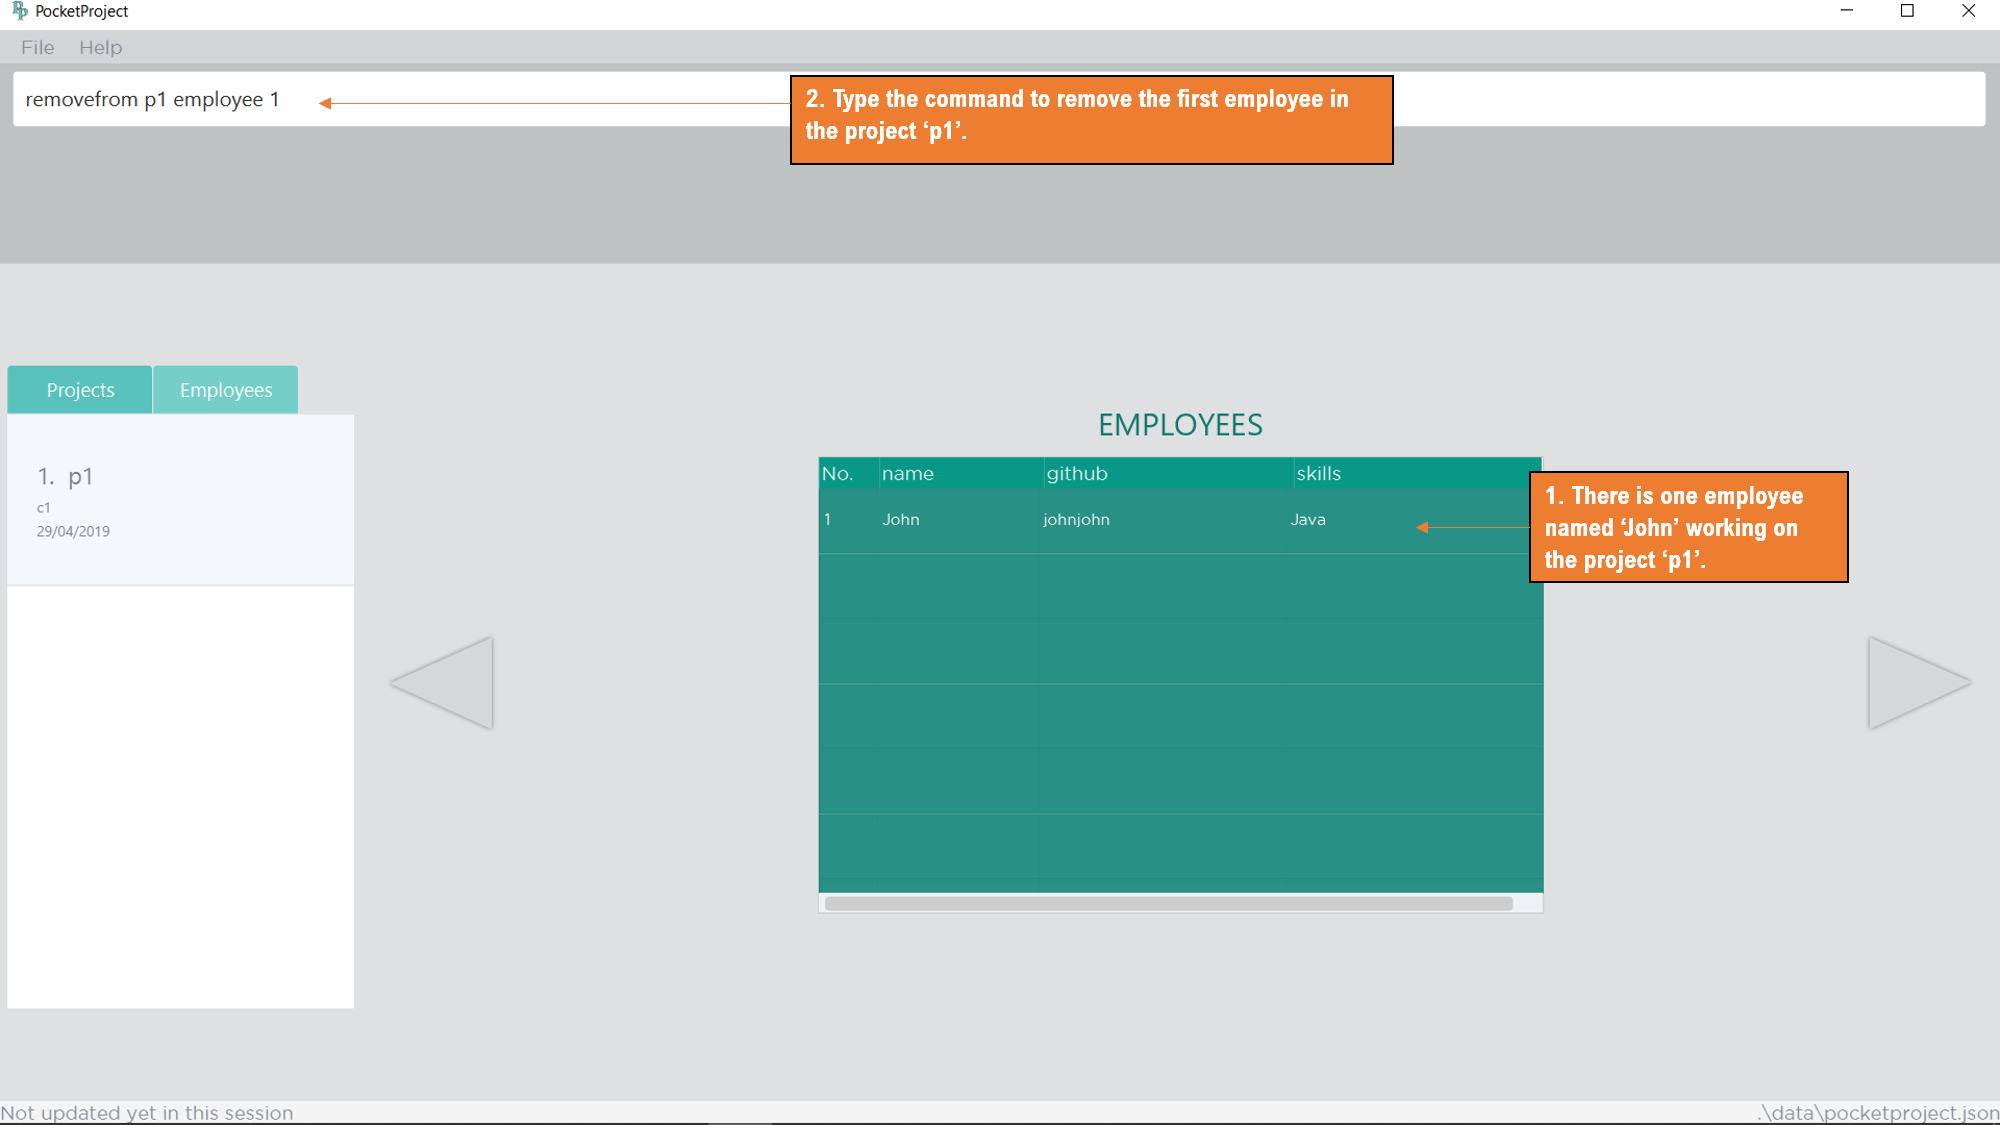
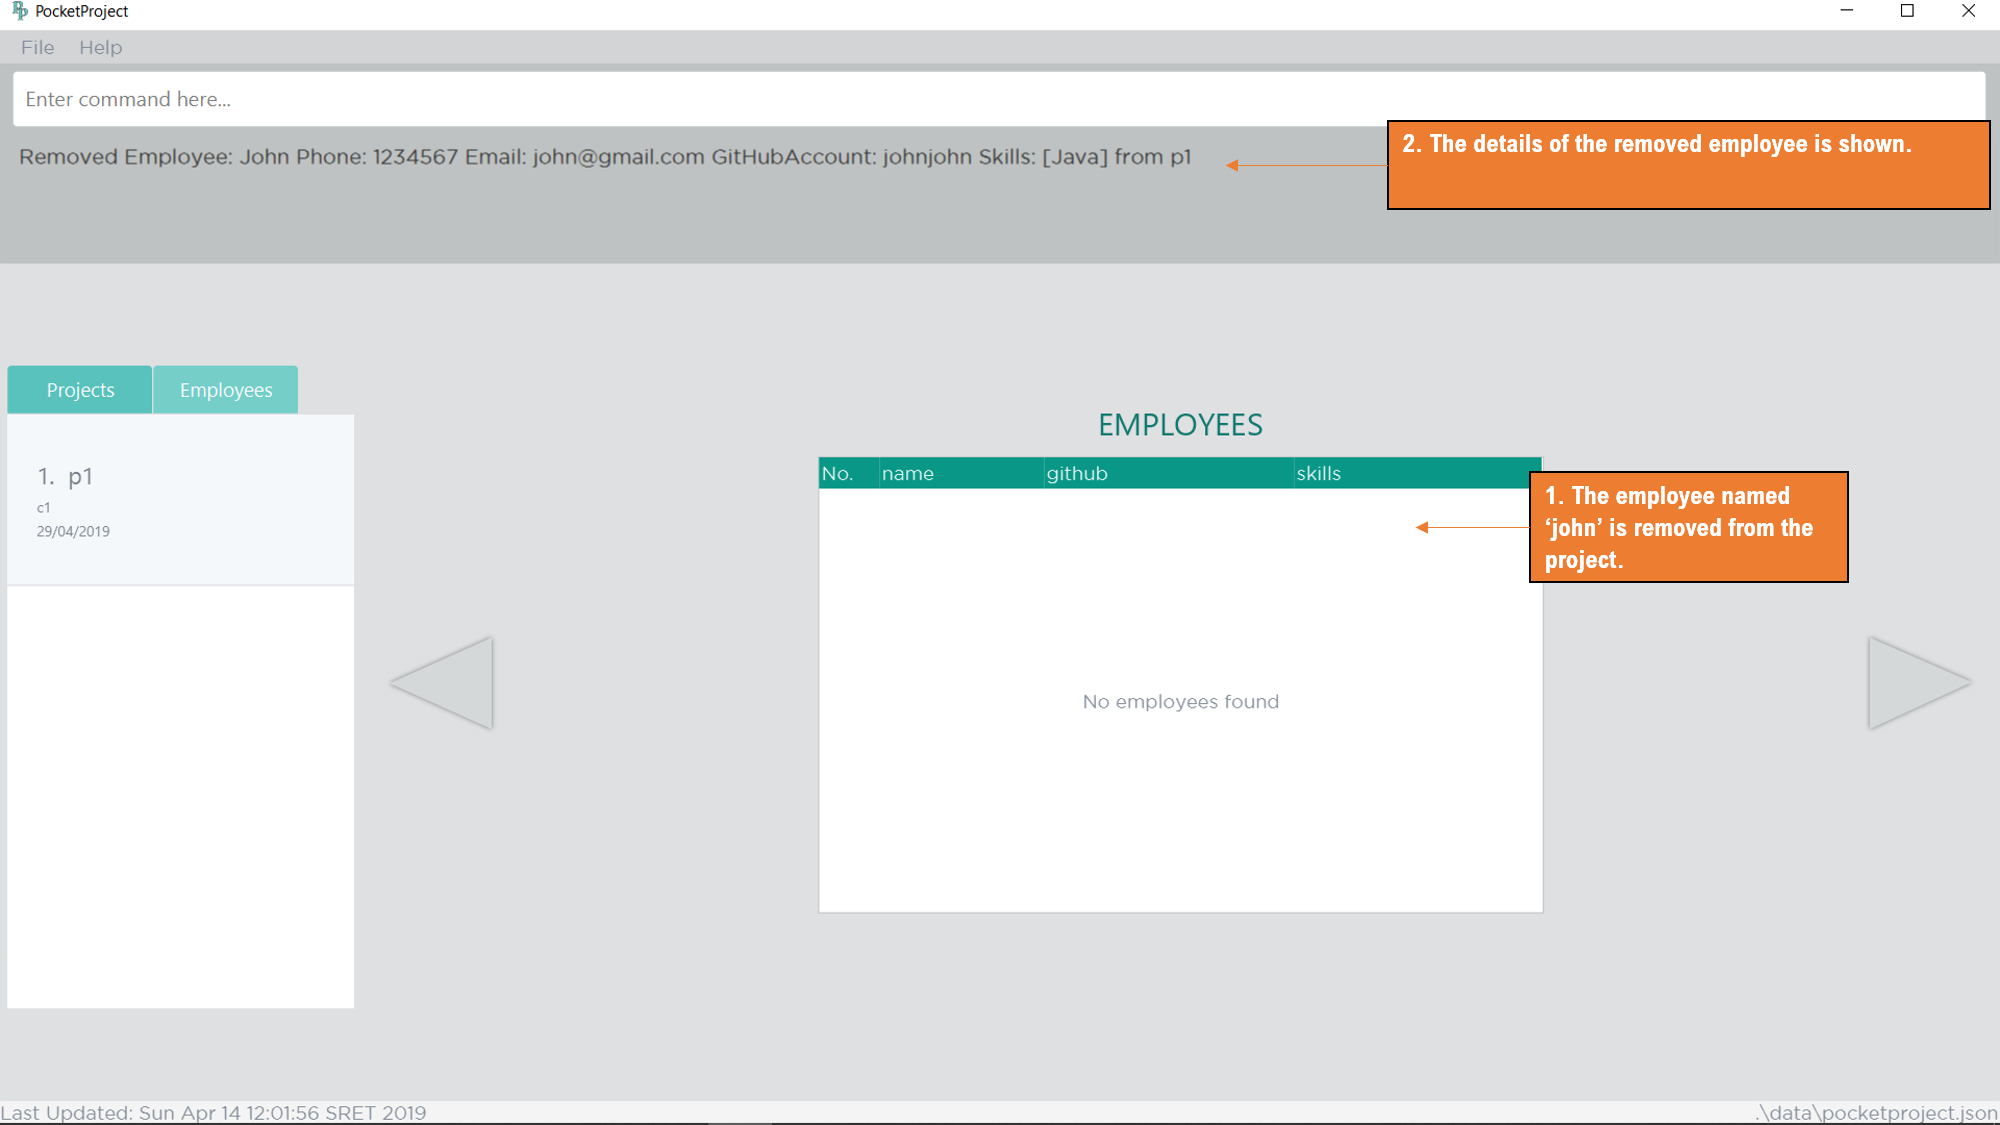
-
view project 1
click on the right arrowhead till the page showing the list of employees in the project
removefrom p1 employee 1
Removes the employee at first position at displayed list of employees from the project 'p1'. The effect of the command is demonstrated in the two figures above.
4.6.2. Remove a milestone from a project: removefrom PROJECT_NAME milestone
Removing a milestone from a project.
Format: removefrom PROJECT_NAME milestone MS_INDEX
Examples:
-
view project Apollo
removefrom Apollo milestone 1
Removes the milestone at 1st position of displayed list of milestone from Project Apollo.
|
Removes the employee at the specified |
|
The index must be a positive integer and cannot be larger than the size of the list. |
4.6.3. Remove a project task from a project’s milestone: removefrom PROJECT_NAME projecttask
You can remove existing project tasks from a milestone if there is a change in the planned project’s schedule.
Format: removefrom PROJECT_NAME projecttask MILESTONE_INDEX PROJECT_TASK_INDEX
|
The |
Examples:
-
removefrom Apollo projecttask 1 1
The 1st project task in the task list under the 1st milestone of the displayed milestone list in project "Apollo" will be removed. -
removefrom Orbital projecttask 2 1
The 1st project task in the task list under the 2nd milestone of the displayed milestone list in project "Orbital" will be removed.
You can refer to the figure below to have a clearer picture of how it looks like when the command removefrom Orbital projecttask 2 1 is called.
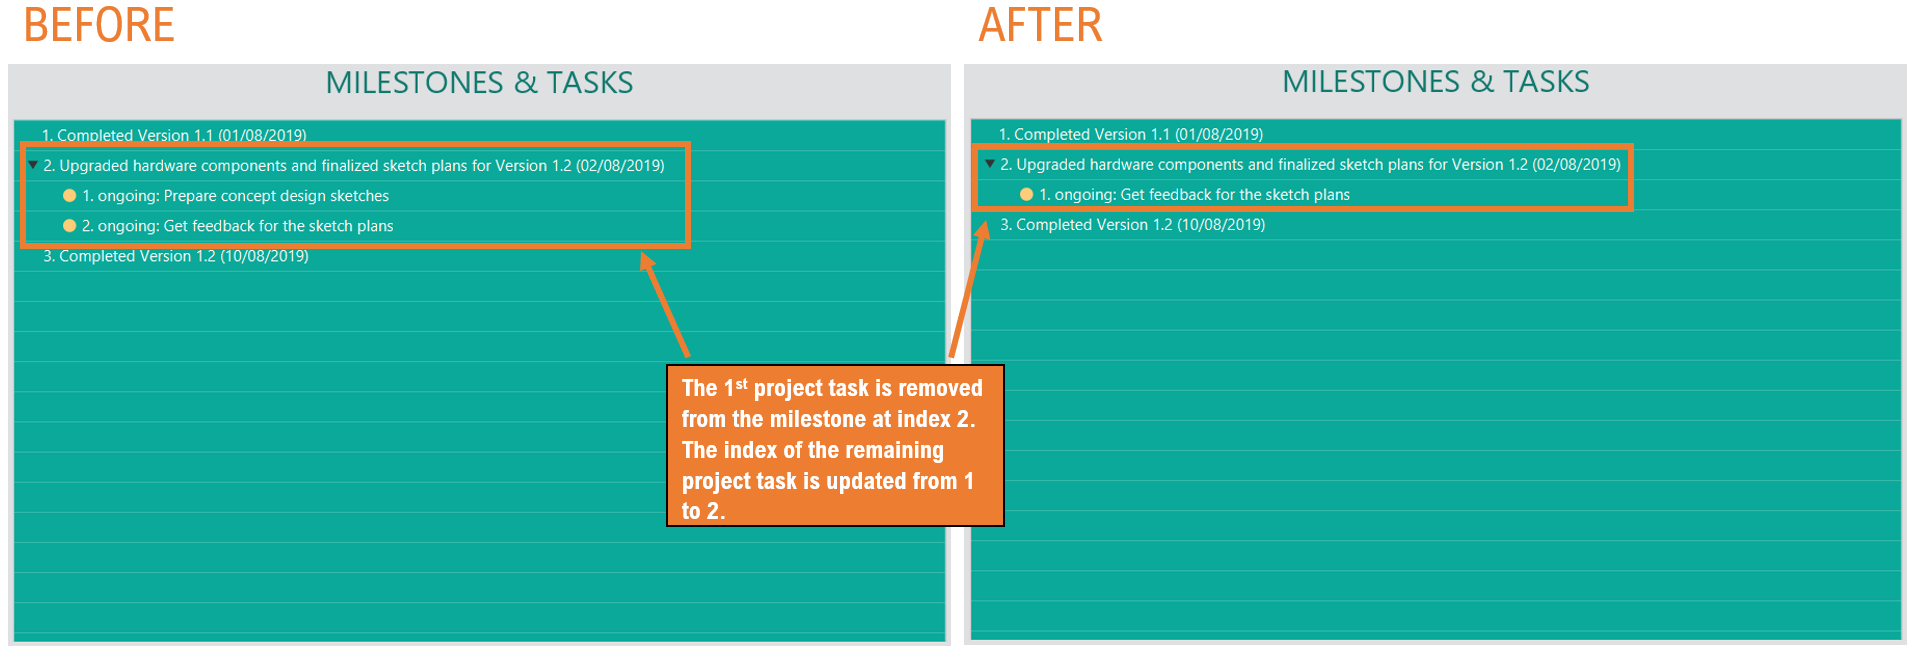
|
The arrow beside the milestone description for collapsing the task list will disappear if all tasks for that milestone are removed. |
4.6.4. Remove a user story from a project: removefrom userstory
You can remove a user story from a project.
Format: removefrom PROJECT_NAME userstory INDEX
Examples:
-
view project Apollo
removefrom Apollo userstory 2
Removes the user story at the 2nd position of the list of user stories from Project Apollo.
Refer to the screenshots below to see the changes in the user stories list after the command above has been executed.
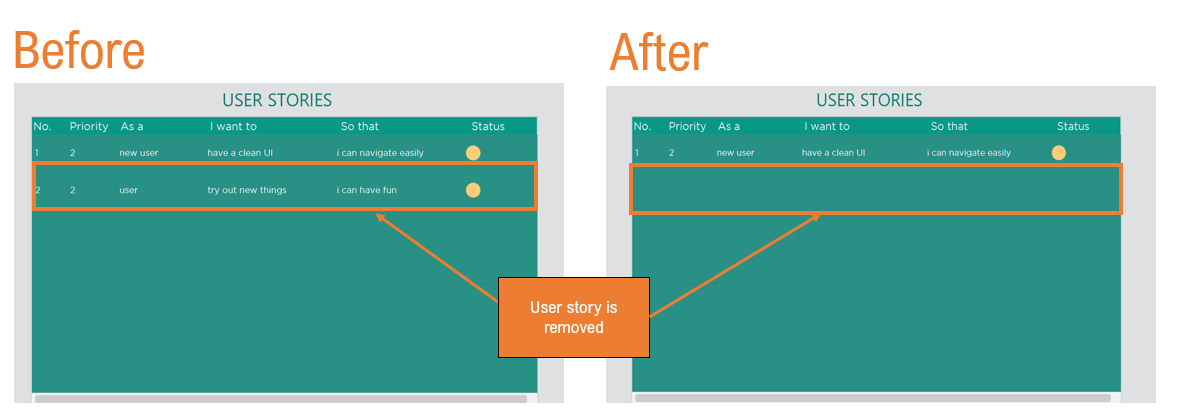
4.7. Edit an employee/project in the application : edit
4.7.1. Edit an employee in the application: edit employee
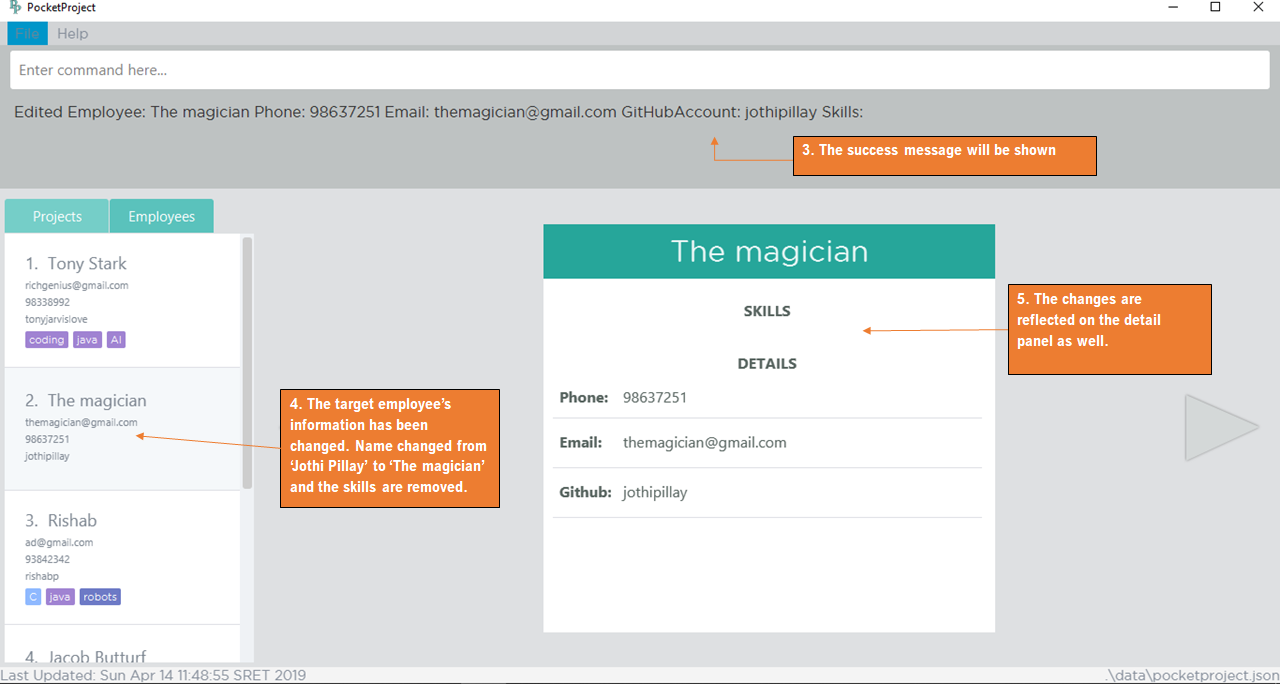
You can edit the details of an existing employees whenever there are changes made to the employee’s details such as name, phone, email, github and their skills.
Format: edit employee INDEX [n/NAME] [p/PHONE] [e/EMAIL] [g/GITHUB] [s/SKILL]…
At least one of the optional fields must be provided and all existing values will be updated with the input values. When editing skills, the existing skills of the person will be removed i.e adding of skills is not cumulative.
Examples:
-
edit employee 1 p/91234567 e/johndoe@example.com
Edits the phone number and email address of the 1st employee to be91234567andjohndoe@example.comrespectively. -
edit employee 2 n/Betsy Crower s/Java
Edits the name of the 2nd person to beBetsy Crowerand sets Java as the only skill. -
edit employee 2 n/Betsy Crower s/C s/HTML
Edits the name of the 2nd employee to beBetsy Crowerand sets C and HTML as the skills.
|
Edits the employee at the specified |
|
The index must be a positive integer and cannot be larger than the size of the list. |
|
You can remove all the person’s skills by typing |
Below is the before and after screenshot to illustrate better. The command that will be
used to show the difference will be edit employee 2 n/The magician p/98637251 s/.
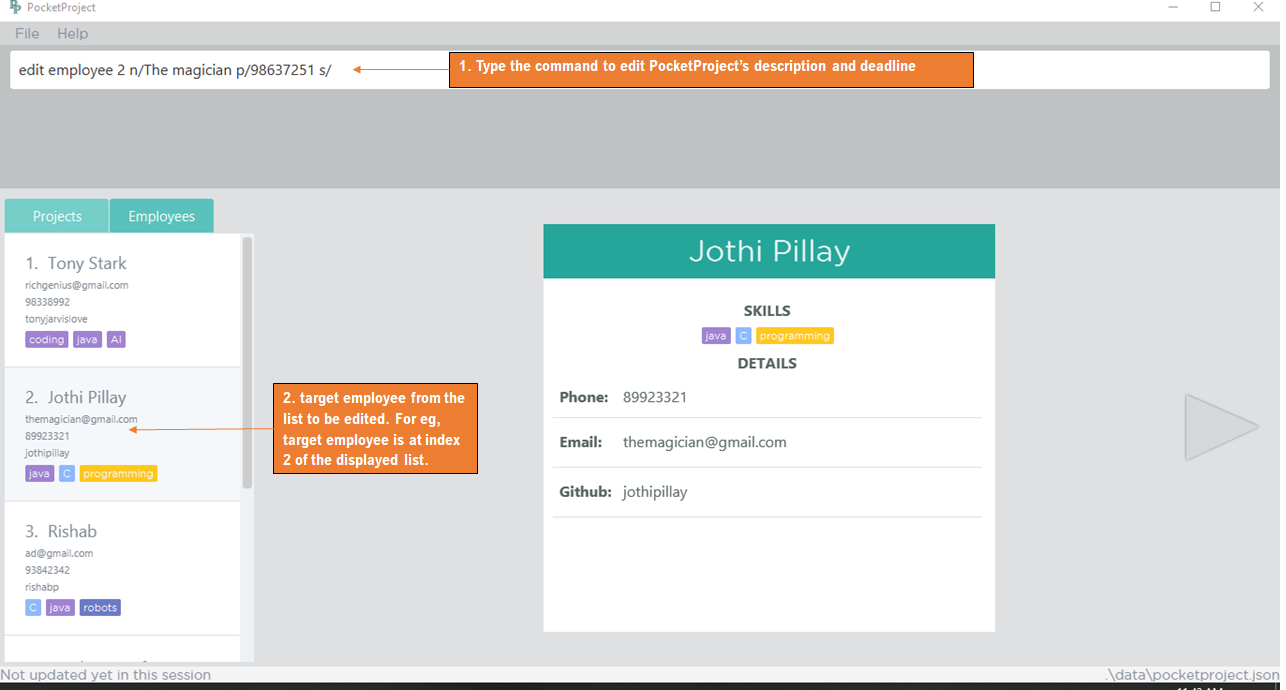
4.7.2. Edits name/client/deadline/description of a project: edit project info
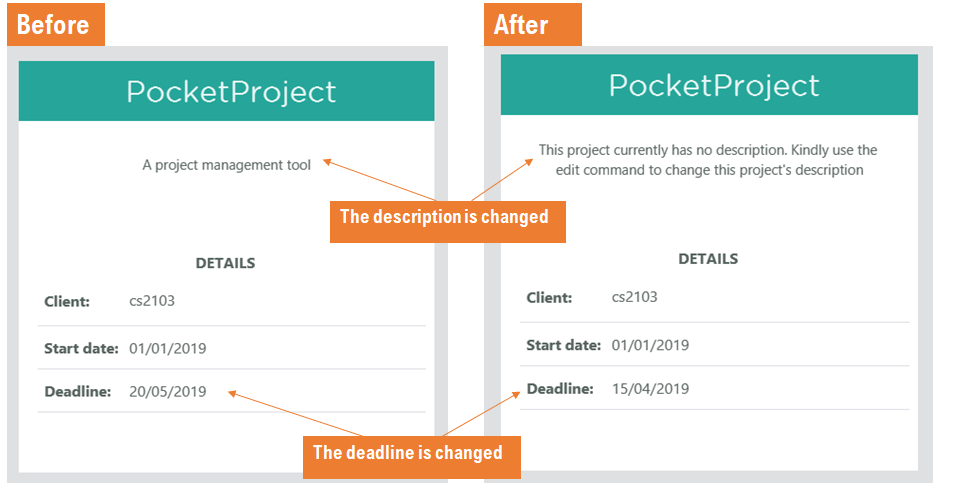
You can use this command to edit the general details of an existing project such as project name, deadline, client and description which are shown on the summary panel of the projects.
|
This command can be used to change the default description that is assigned to the project when the project is added. |
Format: edit project PROJECT_NAME info [n/name] [c/client] [d/deadline] [desc/description]
Examples:
-
edit project Apollo info n/Gemini c/John d/12/09/2020 desc/An application for project management
Change project Apollo name to Gemini, client to John, deadline to 12/09/2020 and the description to 'An application for project management'
|
Both the fixed date format and the flexible date can be used here to edit the deadline. |
|
Note that the start date is unmodifiable and the deadline should be after the start date of the project and also after the date of the latest milestone in the project. |
|
Note that 'info' is a reserved word so it is not accepted as part of the argument for the description of the project (e.g. 'm/project info' is not accepted). |
Below is the before and after screenshots of when the command edit project PocketProject info desc/A project management tool d/20/05/2019 is entered.
edit project PocketProjcet info desc/A project management tool d/20/05/2019 command4.7.3. Edit milestone of a project: edit project milestone
You can edit the milestone of the existing project whenever there are changes made to it.
Format: edit project PROJECT_NAME milestone MILESTONE_INDEX [m/milestone] [d/date]
Examples:
-
edit project Apollo milestone 2 m/Implement edit command d/09/04/2019Change the milestone at index 2 in Apollo to 'Implement edit command (09/04/2019)'
|
The date of the milestone must be between the start date and the deadline of the project |
|
A blank input for milestone description will not be accepted as an input. (e.g. |
|
Note that 'milestone' is a reserved word so it is not accepted as part of the argument for the description of the milestone (e.g. 'm/A milestone for ui' is not accepted). |
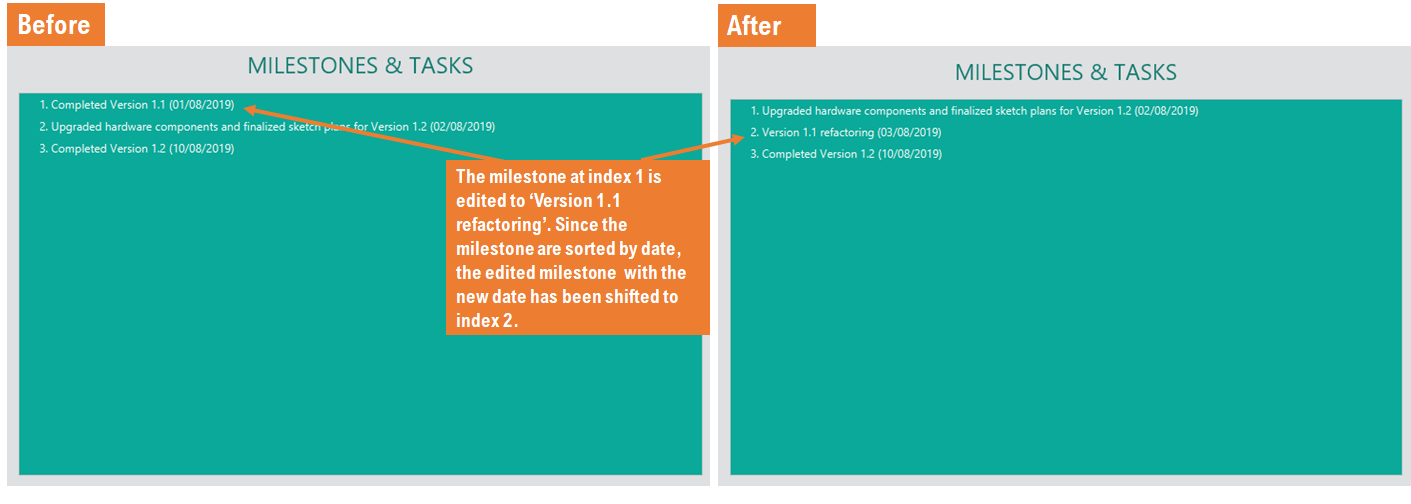
Below is the before and after screenshot of how the command should work. The command
edit project Orbital milestone 1 m/Version 1.1 refactoring d/03/08/2019 will be used to show
this.
edit project Orbital milestone 1 m/Version 1.1 refactoring d/03/08/20194.7.4. Edits User Story in a project: edit project userstory
You can edit the fields of a user story in a project.
Format: edit project PROJECT_NAME userstory INDEX STORY
Examples:
-
edit project Apollo userstory 2 as a manager i want to see my employee’s skills so that i can assign them relevant work -
edit project Apollo userstory 1 as a user i want to be able to login -
edit project Apollo userstory 1 i/2
|
You can also remove an existing reason from a user story by typing |
|
Note that 'userstory' is a reserved word so it is not accepted as part of the argument for the story of the project (e.g. 'm/project userstory' is not accepted). |
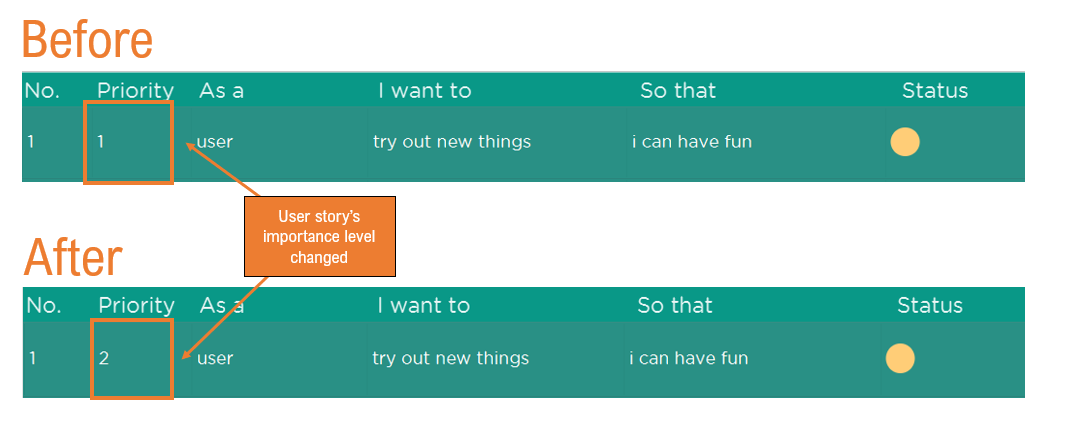
Refer to the screenshot below to see how the fields of the user story has been edited when the command edit project Apollo userstory 1 i/2 is executed.
4.8. Locating employees, projects or skills by name: find
There are several ways available for you to search for employees and projects in PocketProject. Below are the things you should take note for all the find command.
|
The search is case insensitive. e.g |
|
The order of the keywords does not matter. e.g. |
|
Persons matching at least one keyword will be returned (i.e. |
|
Only full words will be matched e.g. |
4.8.1. Find employees in the application: find employee
You can search for employees by using their names as of the given keywords.
Format: find employee KEYWORD [MORE_KEYWORDS]
Examples:
-
find employee John
ReturnsjohnandJohn Doe -
find employee Betsy Tim John
Returns any person having namesBetsy,Tim, orJohn -
find employee Betsy Tim John
Returns any employee having namesBetsy,Tim, orJohn
Below is a screenshot of what a successful find employee command will look like.
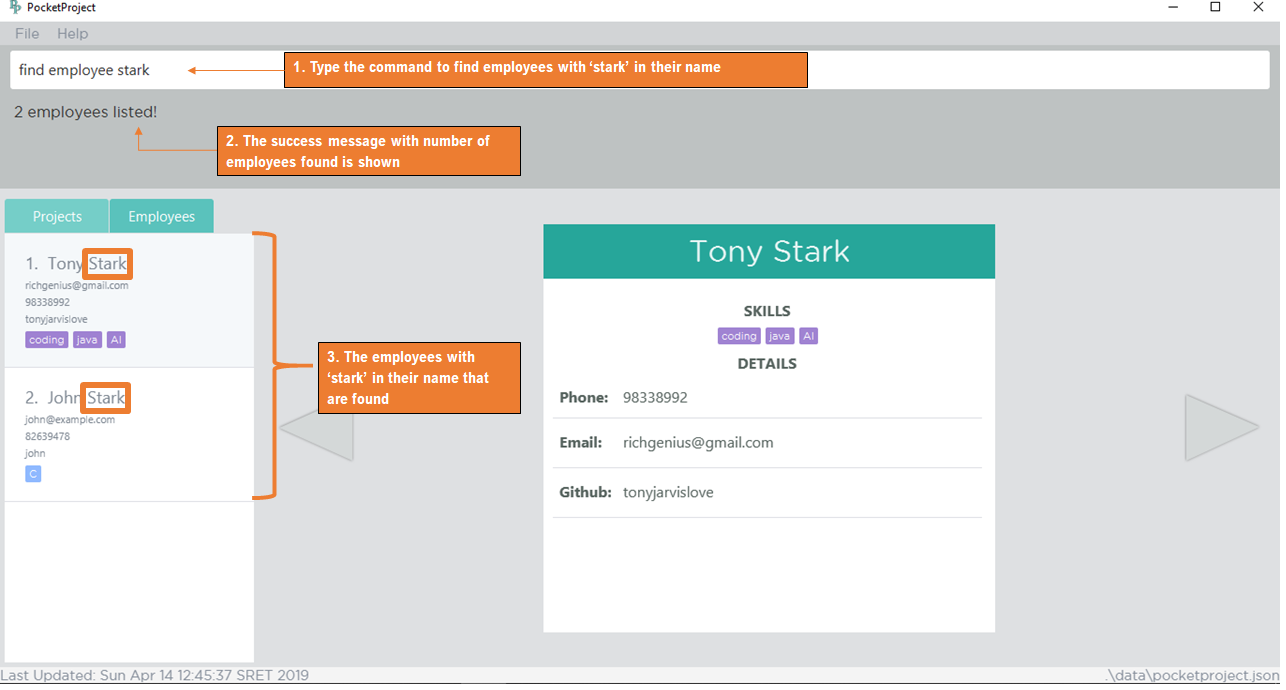
find employee stark command4.8.2. Find employees with skills: find skill
You can look for employees by using their skills as keyword. This will make things easier for you when you need to find employees to assign to projects which require a certain skill.
Format: find skill KEYWORD [MORE_KEYWORDS]
Examples:
-
find skill java
Returns a list of employees who has java skill. -
find skill java CReturns a list of employees who have either java or C or both.
Below is a screenshot of what a successful find skill command will look like.
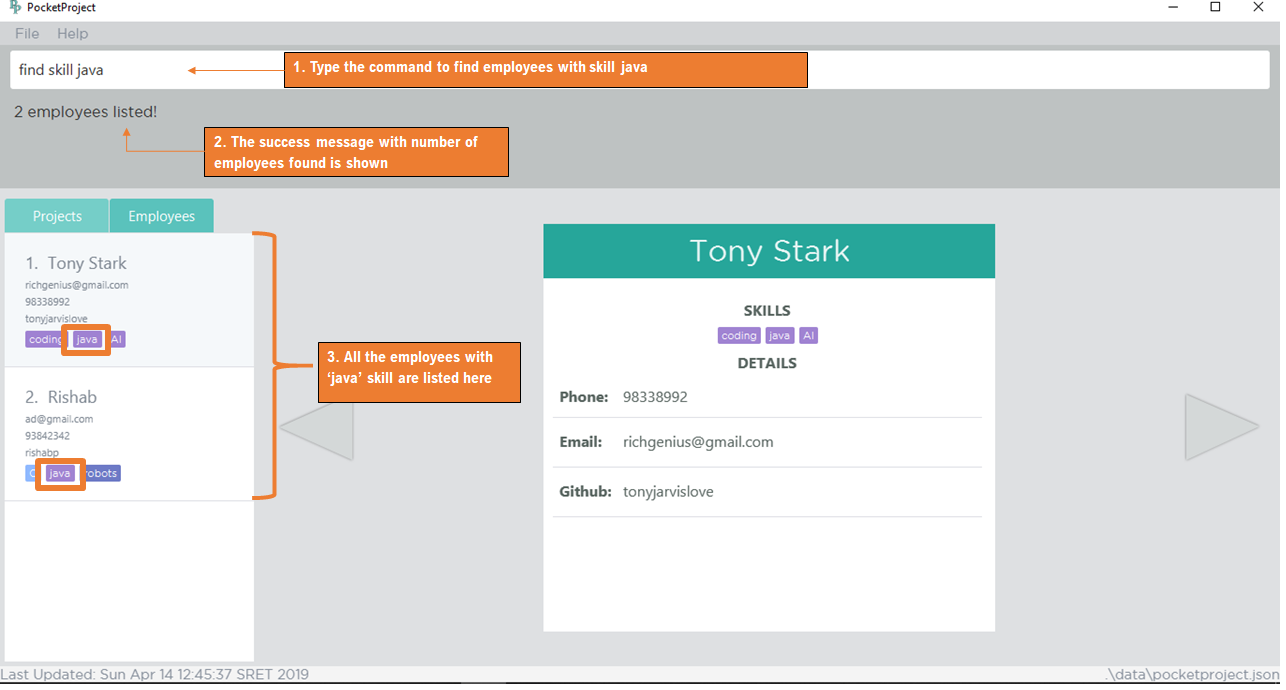
find skill java command4.8.3. Find projects in the application: find project
Similarly for the projects, you can find projects using the project names as keywords.
Format: find project KEYWORD [MORE_KEYWORDS]
Examples:
-
find project Apollo
Returns a list of projects with names that contain Apollo
Below is a screenshot of what a successful find project command will look like.
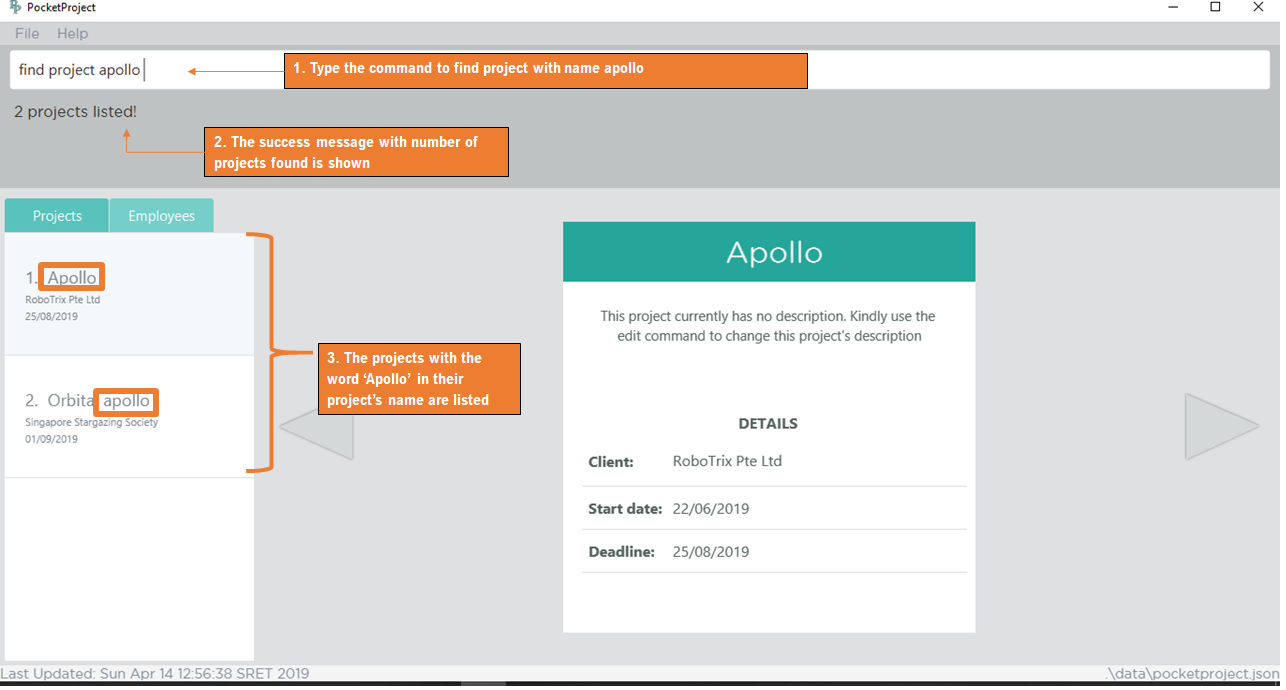
find project apollo command4.8.4. Find projects with any keywords: find all
This find all command allows you to find projects even if you have forgotten the project name. You can simply try to find the project using words that appear in the description of the project. If you remember the name of the client, you can use the client name to find the project too.
Format: find all KEYWORDS [MORE KEYWORDS]
Examples:
-
find all software foodReturns a list of projects which contains either software or food or both as part of the name/description/client.
Below is a screenshot of what a successful find all command will look like.
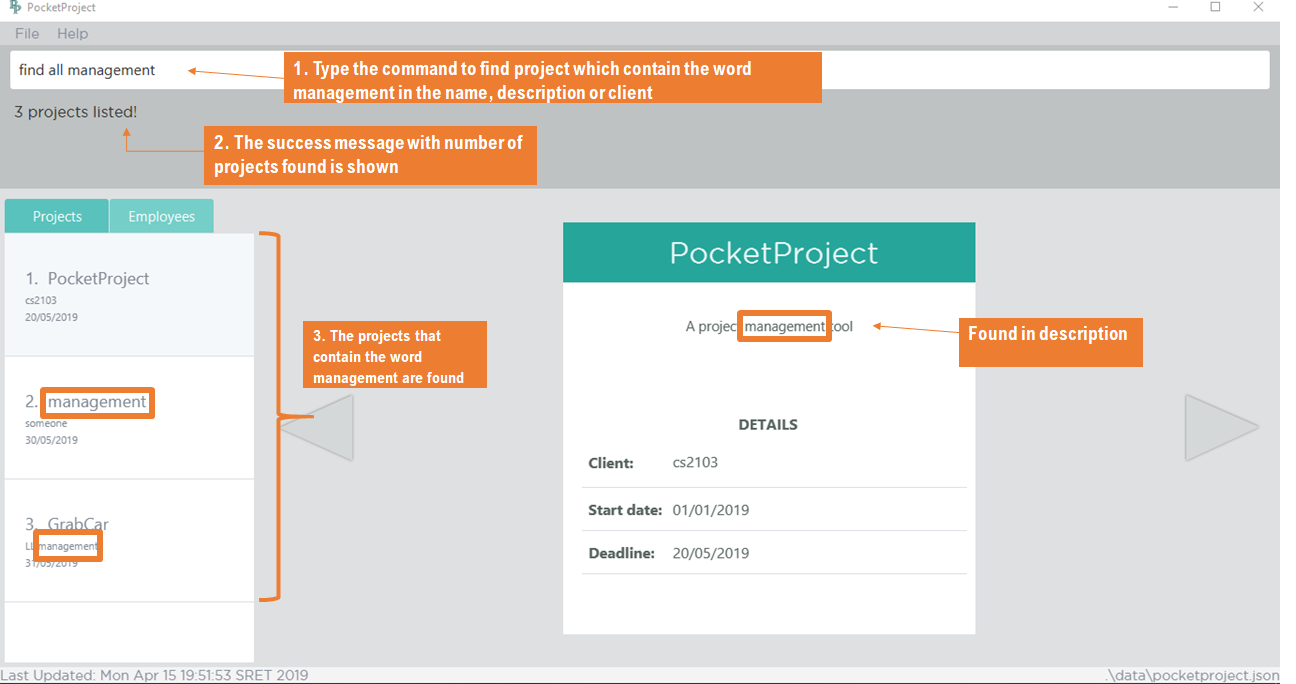
find all management command4.8.5. Find projects with deadline: 'find deadline'
In order to manage your workload and be aware of the upcoming deadline, you can find all the project which will be due before a certain date.
Format: find deadline KEYWORD
Examples:
-
find deadline 15/04/2019
Returns a list of projects which has 15/04/2019 as the deadline or has deadlines that are before 15/04/2019
|
Only accept one argument. e.g. will not accept |
|
Accepts both flexible date and calender date |
Below is a screenshot of what a successful find project command will look like.
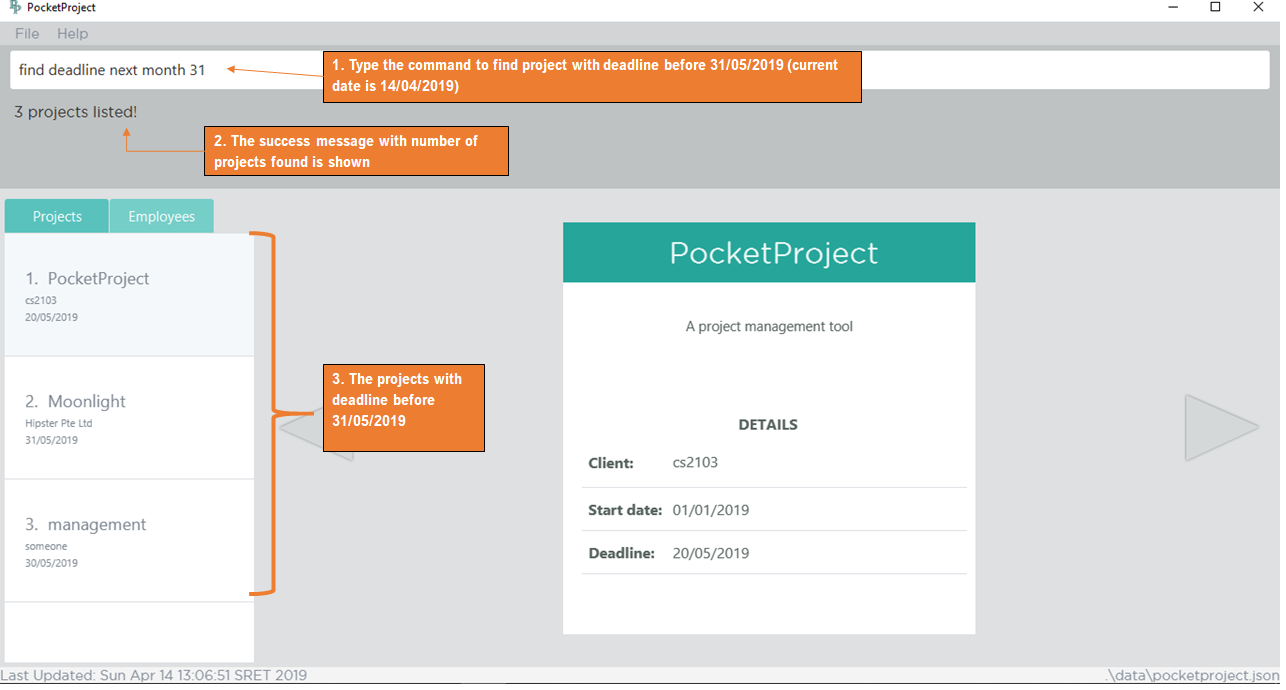
find deadline this month 31 command4.9. Update a user story/project task status: update
You can update the statuses of events to track their progress.
Currently, there are 3 valid status which update supports:
-
ongoing: indicate that the event is ongoing -
on hold: indicate that the event is placed on hold -
complete: indicate that the event has been completed
Each of the different statuses are also visually different in their colour coding. For more information about the different colours used, refer to Section 3.3, “Colour coding”.
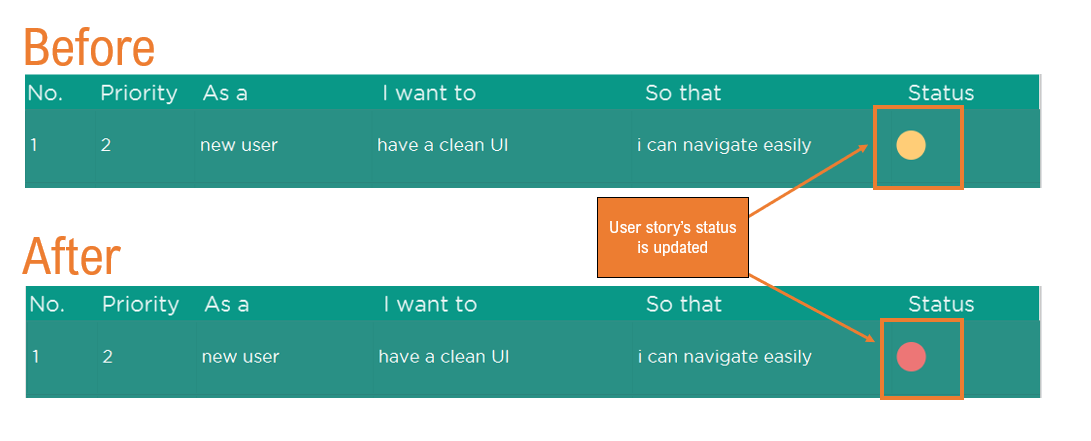
4.9.1. Update the status of a user story: update userstory
You can update the status of a user story to indicate its progress.
Format: update PROJECT_NAME userstory INDEX STATUS
Examples:
-
update Apollo userstory 1 on hold
Updates the first user story in Apollo to be on hold.
You may refer to the screenshot below to see how the user story is updated after the command update Apollo userstory 1 on hold is executed.
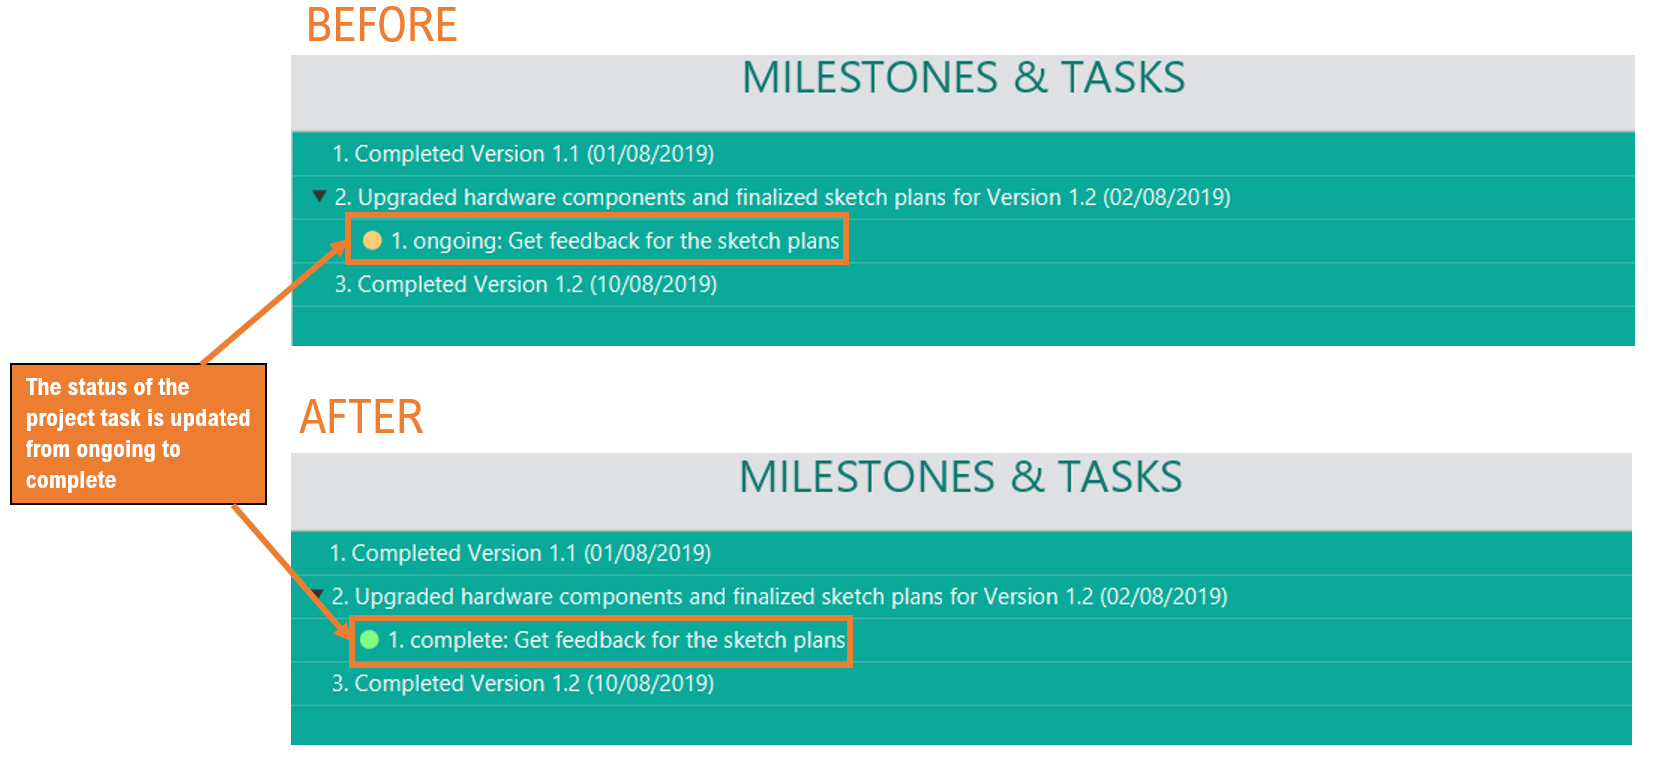
4.9.2. Update the status of a project task: update projecttask
You can update the status of a project task to indicate its progress.
Format: update PROJECT_NAME projecttask MILESTONE_INDEX PROJECT_TASK_INDEX STATUS
|
The |
Examples:
-
update Apollo projecttask 1 1 ongoing
Updates the status of the first project task in the first milestone of project 'Apollo' to "ongoing". -
update Orbital projecttask 2 1 complete
Updates the status of the first project task in the second milestone of project 'Orbital' to "complete".
You may refer to the diagram below to get a clearer picture of how updating a project task’s status looks like when the command update Orbital projecttask 2 1 complete is called.
4.10. Listing all employees or projects in application : list
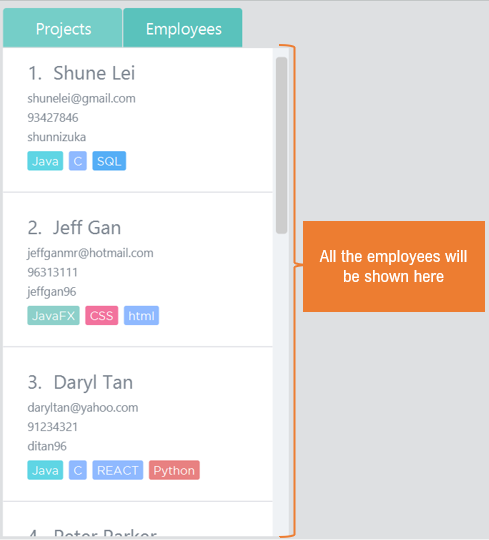
4.10.1. List all employees in the application: list employee
You can list all the employees in the employee list.
Format: list employee
Examples:
-
list employee
You can refer to the screenshot below for an example.
4.10.2. List all projects in the application: list project
You can list all the projects in the projects list.
Format: list project
Examples:
-
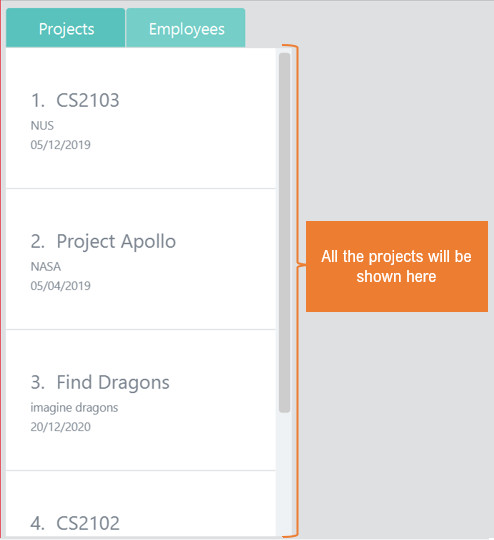
list project
You can refer to the screenshot below for an example.
4.11. View the details of employees or projects : view
4.11.1. View details of an employee: view employee
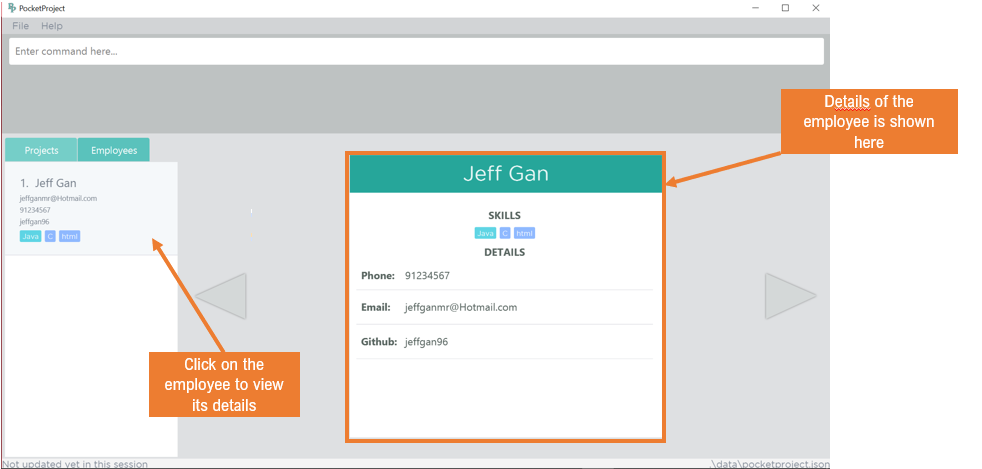
You can view the details of an employee by clicking on the employee in the side tab panel.
Alternatively, you can also use the view command to do so.
Format: view employee EMPLOYEE_INDEX
|
When viewing the employee, the GitHub page of the employee will also be loaded. |
Examples:
-
list employee
view employee 1
Displays details of the employee at index 1 of the employees list
Refer to the screenshot below to see the changes in the screen after a view employee 1 command is executed.
4.11.2. View details of a project: view project
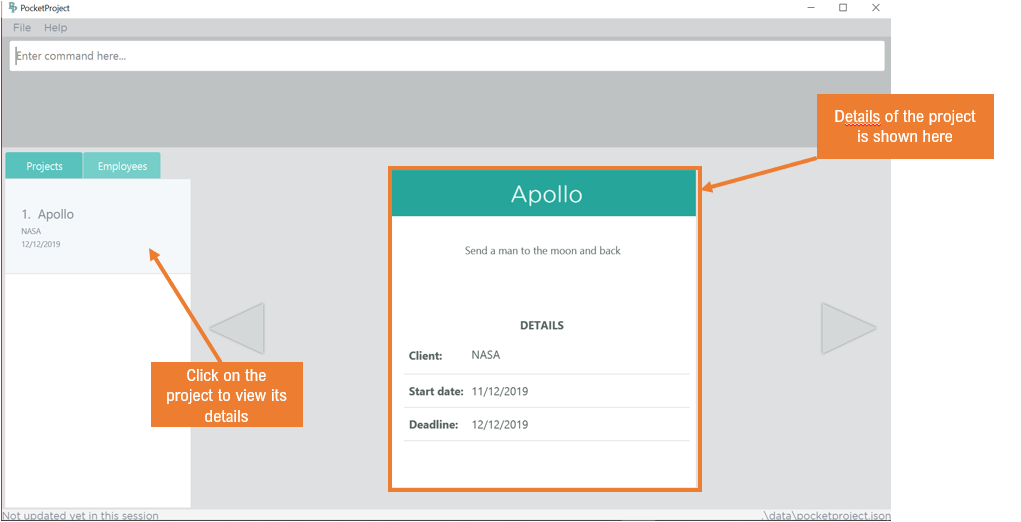
You can view the details of an project by clicking on the project in the side tab panel.
Alternatively, you can also use the view command to do so.
Format: view project PROJECT_INDEX
Examples:
-
list project
view project 1
Displays details of the project at index 1 of the projects list.
Refer to the screenshot below to see the changes in the screen after a view project 1 command is executed.
4.12. To indicate the project has been completed : complete
Indicates that a project is completed. Currently this command has similar effect to deleting the project, but it is meant to support the enhanced statistics feature for V2.0.
Format: complete PROJECT_INDEX COMPLETION_DATE
Examples:
-
list projects
The list of ongoing projects are listed.complete 1 11/11/2011
The first project in the shown list is indicated as completed on 11/11/2011.
4.13. Display statistics regarding the projects : stats
Returns an overview of all ongoing projects/the progress of an individual project.
Format: stats or stats PROJECT_NAME/stats PROJECT_INDEX
+ add something here. Examples:
stats
Number of ongoing projects: 5
Projects with deadline in this month:
------------------------
1. Project6 | deadline: 17/04/2019|reached 0 out of 1 milestones
------------------------
2. Project2 | deadline: 17/06/2019|reached 1 out of 1 milestones
3. Project3 | deadline: 17/06/2019|reached 1 out of 1 milestones
4. Project1 | deadline: 17/05/2019|reached 0 out of 1 milestones
5. Project4 | deadline: 17/05/2019|reached 0 out of 0 milestones
stats 1
Progress of p1:
deadline: 29/04/2019 | reached 0 out of 1 milestones
Milestones not reached yet:
1. Finish userguide | deadline: 28/04/2019 | 0 out of 1 tasks completed.
4.14. Undoing previous command : undo
Restores the Pocket Project to the state before the previous undoable command was executed.
Format: undo
|
Undoable commands: those commands that modify the Pocket Project’s content
( |
Examples:
-
delete employee 1
list
undo(reverses thedelete employee 1command) -
view employee 1
list
undo
Theundocommand fails as there are no undoable commands executed previously. -
delete project 1
clear
undo(reverses theclearcommand)
undo(reverses thedelete project 1command)
4.15. Redoing the previously undone command : redo
Reverses the most recent undo command.
Format: redo
Examples:
-
delete employee 1
undo(reverses thedelete employee 1command)
redo(reapplies thedelete employee 1command) -
delete project 1
redo
Theredocommand fails as there are noundocommands executed previously. -
delete project 1
clear
undo(reverses theclearcommand)
undo(reverses thedelete project 1command)
redo(reapplies thedelete project 1command)
redo(reapplies theclearcommand)
|
The redo command can only be called if there is an undo command that has not been "redo-ne" yet. |
4.17. Exiting the program : exit
Exits the program.
Format: exit
4.18. Saving the data
Pocket Project data is saved in the hard disk automatically after any command that changes the data.
There is no need to save manually.
4.19. Sort the projects by name or deadline : sort [coming in v2.0]
Returns a sorted list of projects by the sort key value. Available keys: name, deadline.
Name: returns list in lexicographic order
Deadline: returns list by earliest deadline first.
Format: sort KEY_VALUE
Examples:
-
sort name
List of project have been sorted by name. -
sort deadline
List of projects have been sorted by deadline with the earliest deadline displayed at the top of the list.
4.20. Encrypting data files [coming in v2.0]
{explain how the user can enable/disable data encryption}
4.21. Project commands [coming in v2.0]
{Commands related to managing of project will be added soon.}
5. FAQ
Q: How do I transfer my data to another Computer?
A: Install the app in the other computer and overwrite the empty data file it creates with the file that contains the data of your previous Pocket Project folder.
6. Command Summary
| Command | Format | Examples |
|---|---|---|
Add Employee to Application |
|
|
Add Project to Application |
|
|
Add Employee To Project |
|
|
Add Milestone To Project |
|
|
Add Project Task To Project |
|
|
Add User Story To Project |
|
|
Delete Employee from Application |
|
|
Delete Project from Application |
|
|
Remove Employee From Project |
|
|
Remove Milestone From Project |
|
|
Remove Project Task From Project |
|
|
Remove User Story From Project |
|
|
Edit Employee’s Details |
|
|
Edit Project Details |
|
|
Edit Milestone Details In The Project |
|
|
Edit Userstory Details In The Project |
|
|
Find Employees Using Name |
|
|
Find Employees Using Skills |
|
|
Find Projects Using Name |
|
|
Find Projects Using Words Found In Name And Description |
|
|
Find Projects Using Deadline |
|
|
Update User Story Status |
|
|
Update Project Task Status |
|
|
List All Employees |
|
|
List All Projects |
|
|
View Employee Details |
|
|
View Project Details |
|
|
Complete A Project |
|
|
Display Statistics Of All Project |
|
|
Display Statistics Of A Single Project |
|
|
-
Exit:
exit -
Help :
help


