About PocketProject
PocketProject is a project developed by my team and I as part of our Software Engineering Project. Our team decided to morph the original codebase given to us into a project management plus employee management software to help software engineering project managers keep track of their projects and employees. In particular, some notable features PocketProject provides includes recording of milestones, user stories, employees information as well as a statistics feature for managers.
Before we begin
Lets start by taking a look at some of the common notations, technical terms as well as symbols used throughout this document:
| What you see | What it means |
|---|---|
|
The note pad icon indicates any useful tips or things that users need to take note. |
|
The exclamation mark icon indicates any warnings that users should be mindful of. |
|
The graduation cap icon indicates any advanced usages or extra technical information about how a particular command works should the users be interested to know. |
|
The grey-highlighting, also known as a |
Summary of contributions
This section contains a summary of my various contributions to the project, ranging from coding to documentation and other helpful contributions I made.
-
A feature I developed: The ability to manage user stories in a project.
-
What it does: This feature is supported by several commands, which allows a user to add and remove user stories from a project. In addition, a user can also update the progress status of a user story, as well as edit the details of a user story.
-
Why its important: User stories are integral to projects and thus its important to be able to record and keep track of them. Being able to see the progress of different user stories can give a good gauge of the progression of the whole project and whether its on track, as well as allow prioritisation of different enhancements to prioritise based on how important the user story is.
-
Highlights: This enhancement makes use of a unique parsing method which allows users to be able to be flexible in entering input yet allow proper processing of the input to be able to show up elegantly on the UI. In addition, it arranges the user stories by order of their importance for ease of readability.
-
-
Code contributed: [RepoSense] [Functional code] [Test code]
-
Minor contribution : Restructuring and redesigning of the User Interface(UI)
-
Other contributions:
-
Enhancements to existing features:
-
Documentation:
-
Team component:
-
reviewed many of the PRs by team members. Included some for reference: #49, #138, #144
-
Actively tested, reported bugs and gave suggestions in the team’s issue tracker: #58, #61, #68
-
Helped teammates with debugging their code. In particular once I even cloned my teammate’s repository to debug and help her merge: #31
-
-
Community:
-
Contributions to the User Guide
In this section, I will showcase some of my contributions to the User Guide to demonstrate my ability to write documentation targetting users of Pocket Project. For a complete list of the documentation I wrote, you may refer to our User Guide: [https://github.com/cs2103-ay1819s2-w10-2/main/blob/master/docs/UserGuide.adoc]
Add a user story to a project: addto userstory
You can add a user story to a project. User stories are tools used in software development to capture a description of a software feature from an end-user perspective.
Format: addto PROJECT_NAME userstory i/STORY_IMPORTANCE STORY
|
|
|
|
Examples:
-
addto Apollo userstory as a new user i want to have a clean UI so that i can navigate easily i/2 -
addto Apollo userstory i/1 as a user i want to try out new things so that i can have fun
|
You can input the importance level or the actual user story in any order. |
|
A valid user story can also be simply: E.g |
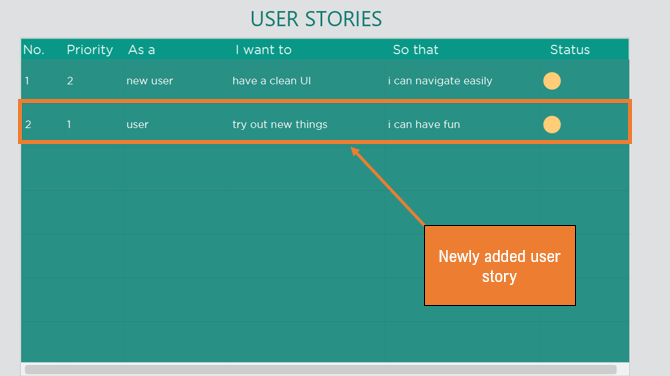
Upon a successful addition of a user story, you should be able to see the new user story in the list of user stories. You may need to toggle the buttons to get to the correct panel.
Refer to the screenshot below to see how the new user story is shown.
Remove a user story from a project: removefrom userstory
You can remove a user story from a project.
Format: removefrom PROJECT_NAME userstory INDEX
Examples:
-
view project Apollo
removefrom Apollo userstory 2
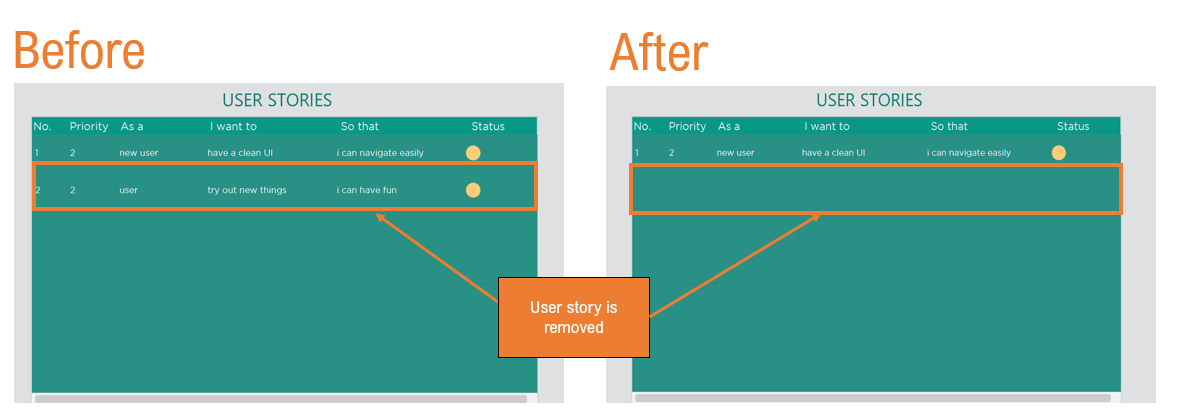
Removes the user story at the 2nd position of the list of user stories from Project Apollo.
Refer to the screenshots below to see the changes in the user stories list after the command above has been executed.
Update the status of a user story: update userstory
You can update the status of a user story to indicate its progress.
Format: update PROJECT_NAME userstory INDEX STATUS
Examples:
-
update Apollo userstory 1 on hold
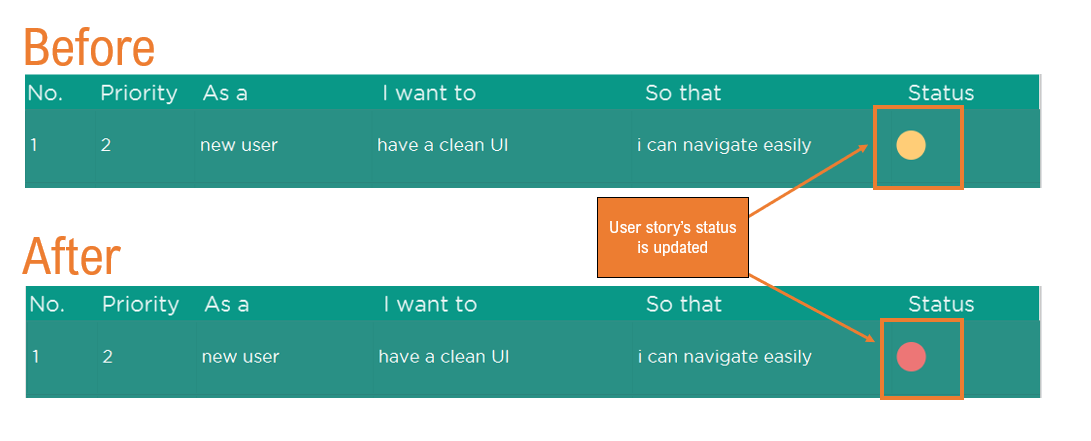
Updates the first user story in Apollo to be on hold.
You may refer to the screenshot below to see how the user story is updated after the command update Apollo userstory 1 on hold is executed.
Contributions to the Developer Guide
In this section, I will showcase some of my contributions to the Developer’s Guide to demonstrate my ability to write technical documentation. For a complete list of the documentation I wrote, you may refer to our Developer Guide: [https://github.com/cs2103-ay1819s2-w10-2/main/blob/master/docs/DeveloperGuide.adoc]
UI component

Add user story to project command
-
addto PROJECT_NAME userstory i/STORY_IMPORTANCE STORY— adds the user story specified inSTORYto the list of user stories in the project with namePROJECT_NAME
This operation uses the Model#addUserStoryTo(Project, UserStory) and the Model#getProjectWithName(Name) methods in the Model interface.
It takes in the project and user story as arguments. After checking that the PROJECT_NAME is valid and STORY is created, the AddUserStoryToCommand#execute() method is executed to add the STORY into the project.
Given below is an example usage scenario and how the addition of user story to a project behaves at each step.
Step 1. The user enters the command list project. The app displays the list of projects in the Pocket Project by executing the list project command.
Step 2. The user enters addto Apollo userstory i/1 as a user i want to view user stories so that i can track them. The LogicManager passes the string into the PocketProjectParser which detects it as a AddToCommand. It then passes the string to the AddToCommandParser
which creates an AddUserStoryTo command. The LogicManager then checks for the validity of the user story and executes the Model#addUserStoryTo(Project, UserStory) method to add the new user story.
|
The |
Edit user story command
-
edit project PROJECT_NAME userstory STORY_INDEX— edits the user story at indexSTORY_INDEXin the list of user stories in the project namedPROJECT_NAME.
This operation uses the Project#setUserStory(UserStory, UserStory) method in the Project class as well as the Model#getProjectWithName(Name) method in the Model class. It takes
in as arguments firstly, the old user story to edit, and secondly the new user story to replace it with. The EditProjectUserStoryCommand checks for the validity of the old and new user stories
before the Project#setUserStory(UserStory, UserStory) method is called.
The sequence diagram for the execution of the editing of a user story in a project is as follows:
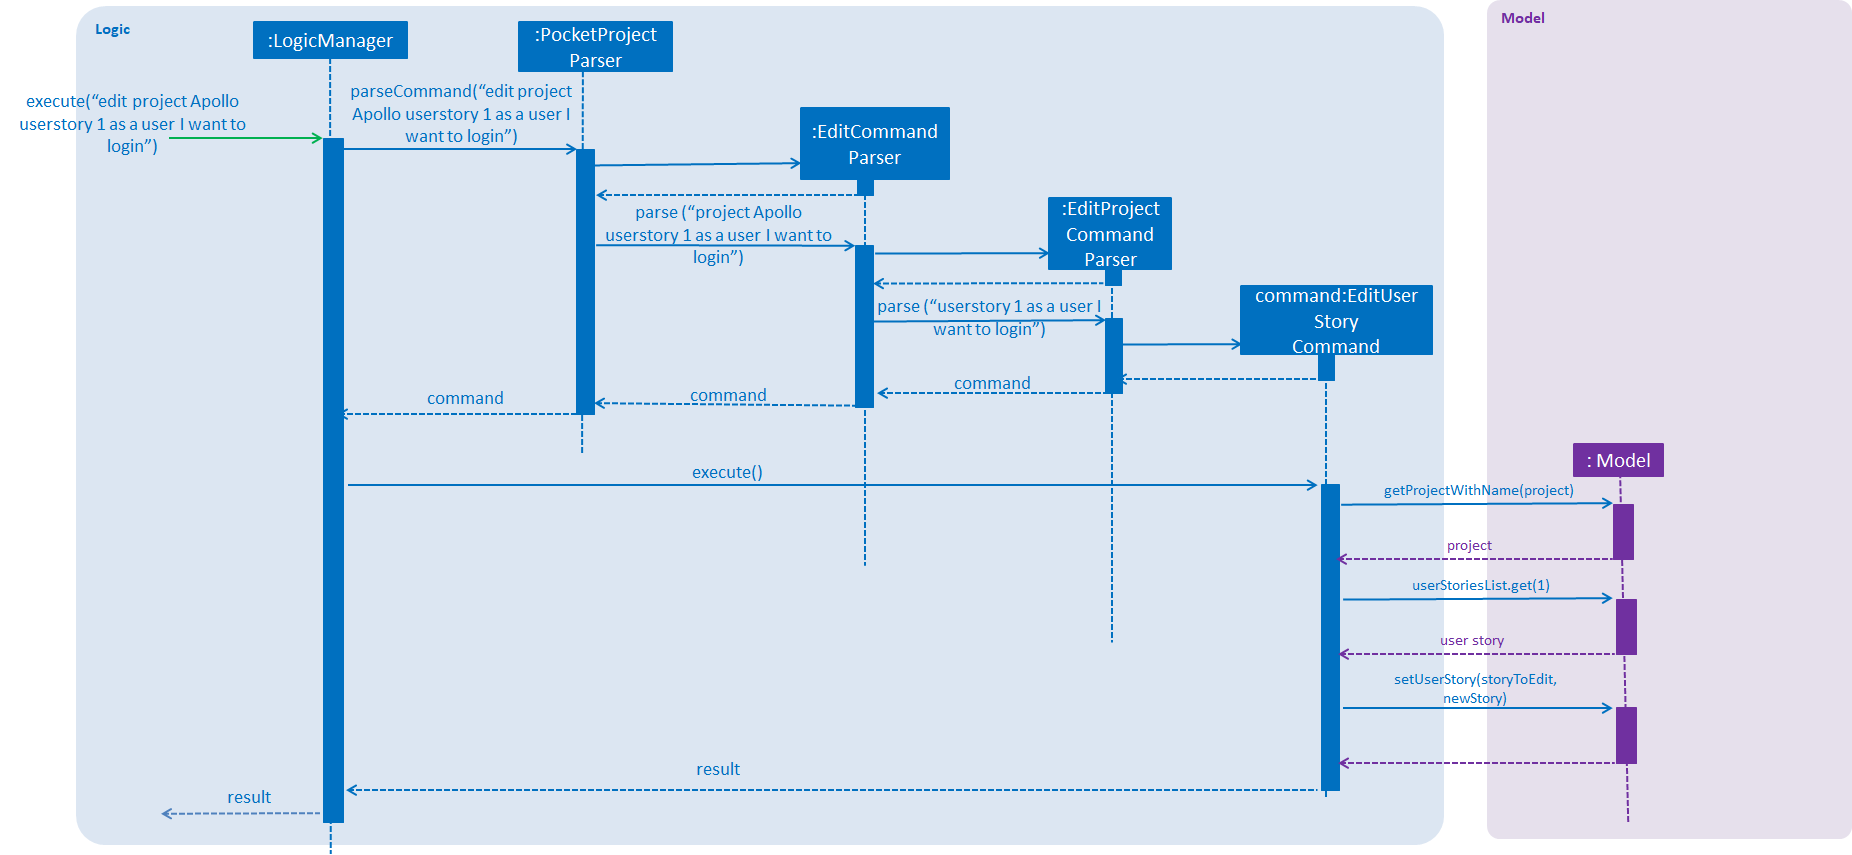
edit project Apollo userstory 1 as a user I want to login.Given below is an example usage scenario and how the editing of a user story behaves at each step.
Step 1. The user enters the command view project Apollo. The app displays the list of details of the project named "Apollo" by executing the view command.
Step 2. The user can use the buttons in the details panel to scroll to the panel showing the user stories.
Step 3. The user enters edit project Apollo userstory 1 as a user i want to login. The LogicManager passes the string into the PocketProjectParser which detects it as a EditCommand.
It then passes the string to the EditCommandParser. The EditCommandParser detects the keyword project and passes the string to the EditProjectCommandParser which creates a EditUserStory command. The LogicManager then checks for the validity of the user
story and project and edits the user story using the Project#setUserStory(UserStory, UserStory) method.
|
The |
Update user story command
-
update PROJECT_NAME userstory STORY_INDEX STATUS— Updates the status of the user story at theSTORY_INDEXin the list of user stories in the project namedPROJECT_NAME.
This operation uses the UserStory#UpdateStatus(Status) method in the UserStory class as well as the Model#getProjectWithName(Name) method in the Model class.
It takes in as arguments the new status of the user story. The UpdateUserStoryCommand checks for the validity of the arguments and locates the specified user story from the project. It then calls the UserStory#UpdateStatus(status) method.
The sequence diagram for the execution of updating a user story status is as follows:
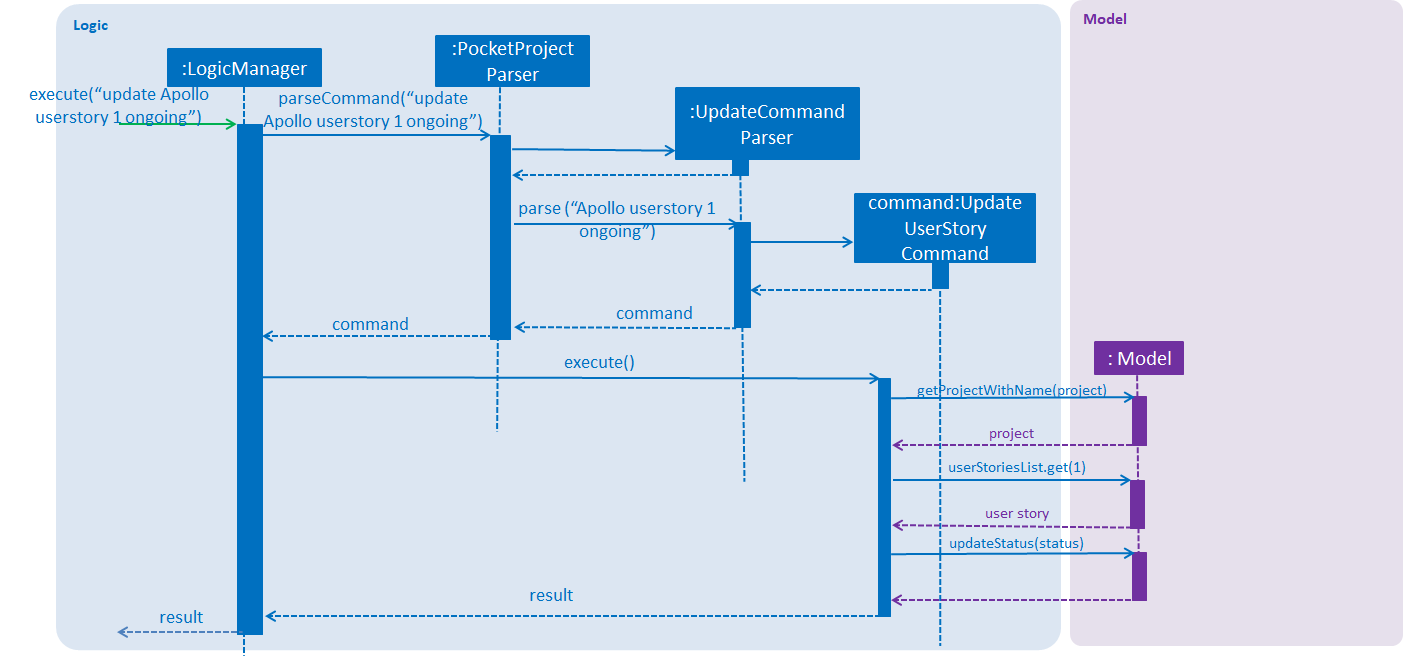
update Apollo userstory 1 ongoing.Given below is an example usage scenario of how the updating of a user story behaves at each step.
Step 1. The user enters the command view project Apollo. The app displays the list of details of the project named "Apollo" by executing the view command.
Step 2. The user can use the buttons in the details panel to scroll to the panel showing the user stories.
Step 3. The user enters update Apollo userstory 1 ongoing. The LogicManager passes the string to the PocketProjectParser which detects the string as a UpdateCommand. The PocketProjectParser passes the rest of the string to the UpdateCommandParser.
The UpdateCommandParser then detects the keyword userstory and creates a UpdateUserStory command object and passes it to the LogicManager to be executed. The LogicManager then checks for the validity of the user story and project and updates the user story’s status using the UserStory#UpdateStatus(Status) method.
|
The |
Design Considerations
Aspect: How to structure the user story details to be inputted into the project
Alternative 1: Use a regex to indicate the importance/priority of a user story, then have the user key in the user story in the specified format as a…i want to…so that…(Current implementation)
Alternative 2: Use only regex to denote the different parts of a user story. For example, i/ to denote the importance level, u/ to denote user etc…
Alternative 3: Store the entire string as given by the user as it is and not parse the input.
Using alternative 3 is the simplest and most straight forward way to handle the user input, but it does not provide much functionality. As user stories should be organised and easy to read as a list,
we will need to use some sort of TableView or ListView to view the stories. Thus, using alternative 3 will only allow the entire string to be generated and is not user friendly.
Between alternative 2 and alternative 1, alternative 2 provides an easier way for the program to generate and partition the input using regex expressions. However, as there are many parts to a user
story, having to remember 4 different regex expressions may be hard for a user to remember and may be inconvenient. Using alternative 1 is a mix of both 2 and 3, which allows abit more flexibility
and smoothness for a user by allowing them to type in full sentences how they would normally do for a user story, while allowing proper classification of the components of the story to be able to
be displayed in the UI component as a TableView.
Aspect: How to show/store the list of user stories
Alternative 1: Sort the user stories only by decreasing priority.
Alternative 2: Sort the user stories by the sequence it is added.
Alternative 3: Sort the user stories only by the names of the target user.
Alternative 4: Sort the user stories by decreasing priority, followed by the name of the target user. (Current implementation)
Using alternative 2 is the simplest and most straightforward approach, but does not provide any value adding to the user. Both alternative 1 and 3 are useful, hence we decided to combine them to produce alternative 4, which allows not only the important user stories to be listed first, but also provides better readability as similar user stories are grouped together.
Future Planned Enhancements
The following additional features are scheduled to be implemented in future version.
-
Allow more varied types of sorting for the users. Since there is no one-size-fit-all solution when deciding which user stories are more relevant, the user should be able to decide how he/she wants them arranged. Hence this proposed feature will allow users to be able to click the user stories table and customise the order in which user stories are shown.
-
Provide even greater flexibility when parsing user stories. Currently, user stories require specific keywords
as a,i want to,so that. In future, users should be able to type sentences naturally and it can still be parsed. This will be made available by widening the range of keywords the parser is able to detect as well as the different sentence structures possible.

