Pocket Project: About the Application
Pocket Project was built by my team and I in our second year in NUS while pursuing a Computer Science degree. We were inspired to create this application as we sought ways to improve efficiency in project management. This application was created with the intention of supporting software engineering project managers throughout the lifetime of a project, from the planning phase until it is delivered to the client.
Pocket Project’s core functionality includes adding user stories to a project which is essential for planning, assigning projects to employees based on their individual skill sets and monitoring the progress of a project through milestones and tasks.
Before We Begin
The following section details and previews a few symbols and formats that will be used in this portfolio.
| Symbol | Meaning |
|---|---|
|
The note pad icon indicates any useful tips or things that you need to take note of while using the Pocket Project application. |
|
The light bulb icon indicates any shortcuts that you can use while using the Pocket Project application. |
|
The exclamation mark icon indicates any warnings that you can take note of while using the Pocket Project application. |
|
Words highlighted, known as |
Summary Of My Contributions
In this section, I detail some of my key contributions towards this application in terms of both features and documentation.
Major Contribution: Smart Dates
-
What it does: This allows the user flexibility in keying in dates when required and supports 2 main sub-formats.
-
Firstly, it supports a fixed date format where users can key in a date according to
DD/MM/YYYY. -
Secondly, it also accepts flexible input from the user. If the user wants a date relative to the current day, he/she can simply type
today/tomorrow/yesterday. Otherwise if the user wants a date relative to current week, he/she can inputthis/next/last week DAY_OF_WEEK. Lastly if the user wants a date relative to the current month, he/she can simply go forthis/next/last month DAY_OF_MONTH. -
The validity of the target date is also verified.
-
-
Why it is useful and important: In this application, dates are used extensively in other features. So, smart dates provides the user with a quick and user-friendly way to execute certain commands. Some of these commands include:
-
Setting of dates when creating and completing projects and milestones.
-
Editing of the all components with dates inside a particular project.
-
Finding projects that are due by a certain
DEADLINE.
-
-
Highlights: The flexible date input is parsed by a separate
PocketProjectDateParser. Also, the user does not need to indicate his/her intended format as the feature is designed to differentiate based on the input received. -
The code that I contributed: Functional Code & Tests Part 1 Functional Code & Tests Part 2
Minor Contributions:

Overall Code Contributions: RepoSense
Other Contributions:
-
Project Management
-
Helped track issues on the team repository using labels and assignees.
-
Compiled and formatted the entire User Guide after individual contributions by team members: #242
-
-
Other Enhancements/Fixes to Existing Features
-
Documentation
-
Community
-
Reviewed pull requests with valid non-trivial feedback: #118 #126 #141 #214 #230
-
Reported bugs and offered suggestions to another team, CS2103-AY1819S2-T12-4, in the module: #247
-
The Smart Date feature that I implemented was adopted by my some of my fellow teammates for use in their own individual features: #165 #209
-
-
Tools
-
Integrated a new GitHub plugin, Codacy, to the GitHub team repository: #154
-
Contributions to the User Guide
In this section, I detail some of the key contributions I made to the User Guide targeted at helping users understand how to use the application.
Date Feature in Pocket Project
Whenever a particular command requires a date field, you can choose to use either of the below mentioned formats.
Fixed Date Format
You can input a date using the fixed date format.
Format: DD/MM/YYYY
Examples:
1. 23/12/2019
2. 09/03/2020
|
The year field will not accept values beyond the
year |
Flexible Date Format
Alternatively, you can also input a date using the flexible date format. The flexible date format allows you to give an input with relation to the current date. It supports the below mentioned 3 formats.
Choosing a date relative to the current day
You can key in today,tomorrow and yesterday to get today’s, tomorrow’s and
yesterday’s date respectively.
Format: today/tomorrow/yesterday
Choosing a date relative to the current week
You can also aim to choose a date with relation to the current week.
Format: this/next/last week DAY_OF_WEEK
|
The |
Examples:
1. next week 7
This would select next week’s Sunday as the target date.
2. last week 2
This would select last week’s Tuesday as the target date.
You can refer to the screenshots of the program below for a clearer picture. Assume that the
current date is 12 April 2019 (12/04/2019), Friday. It will be demonstrated using the add project command which requires
a s/START_DATE and a d/DEADLINE.
![][width="500"](../images/ug-dateweek.png)
Choosing a date relative to the current month
You can also aim to choose a date with relation to the current week.
Format: this/next/last month DAY_OF_MONTH
|
The |
Examples:
1. this month 24
This would select the current month’s 24th day as the target date.
2. next month 17
This would select next month’s 17th day as the target date.
==== Add a project to the application: add project
You can add a project to the Pocket Project when the team takes on a new project so that key details of the project are stored and employees, milestones, tasks and user stories can be assigned to them in the future.
The project has a default description when created and this can be
edited using the edit project info command.
Format: add project n/NAME c/CLIENT_NAME s/START_DATE d/DEADLINE
|
The deadline of the project should minimally be 1 day after the start of a project. |
Examples:
1. add project n/Apollo s/10/03/2019 d/12/12/2019 c/FairPrice
2. add project n/Xtreme c/John Smith s/09/02/2020 d/13/04/2020
You can refer to the screenshot below to have a clearer picture of how it works and looks like.
![][width="500"](../images/ug-addproject.png)
|
You can also view the list of all employees currently working on the project, a list of milestones and tasks, and a list of user stories by toggling the arrows on the details panel. |
These sections are not exhaustive of my contributions and the rest can be viewed at Pocket Project: User Guide
Contributions to the Developer Guide
In this section, I detail some of the key contributions I made to the Developer Guide targeted at helping fellow developers understand the implementation and design considerations that went behind the building of the application.
Pocket Project Dates (Smart Dates)
Overview
As dates are widely used throughout the application, it is important that the user is able to easily input any target date but at the same time retain some flexibility so that it is more user-friendly. Therefore, the dates used in the Pocket Project supports 2 main formats as shown below.
Fixed Date Format
Format(s):
1. DD/MM/YYYY
Flexible Date Format
Format(s):
1.today/tomorrow/yesterday
2.this/next/last week DAY_OF_WEEK
3.this/next/last month DAY_OF_MONTH
How it Works
The section details how a fixed and flexible date format is parsed and processed.

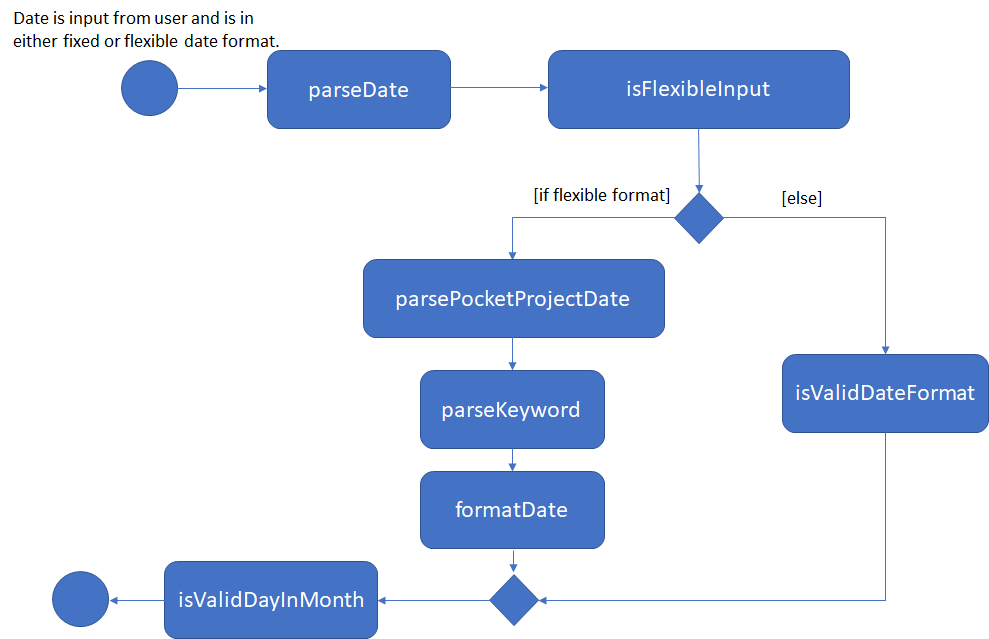
Refer to the Activity Diagram above while reading the summary below so as to have a visual representation of what happens.
To simplify the explanation, the process can be summarized into the following key points:
1. A check is first made to determine if the input is a fixed or flexible date format. This is done by
checking for the presence of a / in the input.
2. If it is a fixed format input, a check is made to determine if it conforms to the DD/MM/YYYY format.
3. If it is a flexible format input, the input is parsed and the PocketProjectParser identifies keywords to determine the appropriate methods to call from the model. The target
date is then formatted into the DD/MM/YYYY format.
4. Regardless of the initial format of the input, the current string would represent the form
of DD/MM/YYYY at this stage. The validity of the date is then checked.
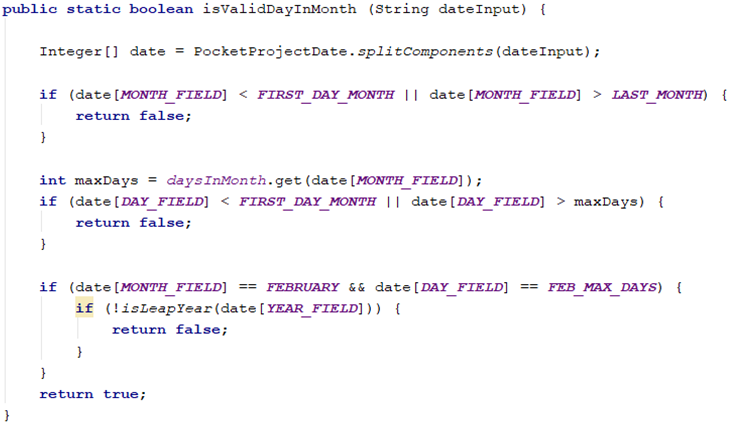
Refer to the code snippet below to see how the validity of the date is verified.

As can be seen above, the code not only checks if the selected day falls within the maximum number of days in a month, but it also checks for leap years. This ensures that only valid calendar dates are accepted as a viable input.
Design Considerations
Potential Design 1
User keys in Wednesday, next Wednesday, last Wednesday to denote the current, next and last week’s Wednesday respectively
Potential Design 2 (Selected Implementation)
User keys in this week 3, next week 3, last week 3 to denote the current, next and last week’s Wednesday respectively
The second design was chosen as the first one is subjective to an individual’s language
use. For example, if today was Monday, and a person was to mention next Wednesday, some people may be thinking of the Wednesday in 2 days time
whereas others may be thinking of next week’s Wednesday. Thus to remove confusion, the keyword this/next/last was added. In addition, instead of spelling out the days,
users can key in the day number instead. This speeds things up and also reduces errors due to spelling mistakes in the name of the day.
Adding Employees and Milestones to a Project
Overview
This feature focuses on the adding of employees and milestones to a selected project. It supports two commands which are explained below.
-
addto PROJECT_NAME employee EMPLOYEE_INDEX
Adds the employee at indexEMPLOYEE_INDEXto the list of employees in the project namedPROJECT_NAME. -
addto PROJECT_NAME milestone m/MILESTONE_DESCRIPTION d/MILESTONE_DATE
Adds the specified milestone to the list of milestones in project namedPROJECT_NAME.
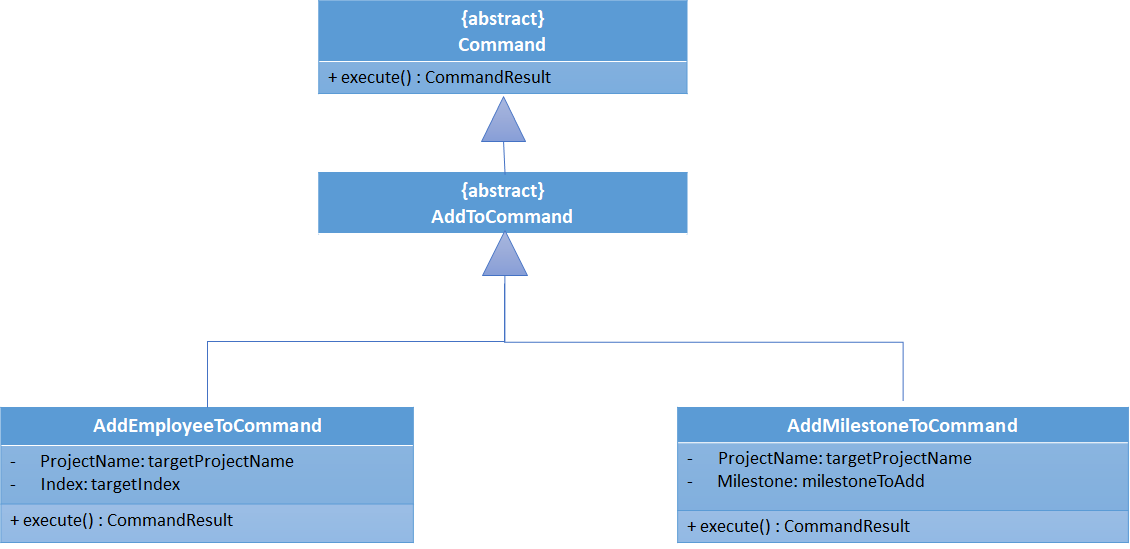
In addition, the AddToEmployeeCommand class and AddToMilestoneCommand class is
abstracted into a AddToCommand class which inherits from Command class. This allows for
further functionalities to be added while conforming to the Open-Closed Principle.
Refer to the Class Diagram below for a better visualization of the inheritance relationship.

How it Works
The section details how a AddToCommand is parsed and processed.

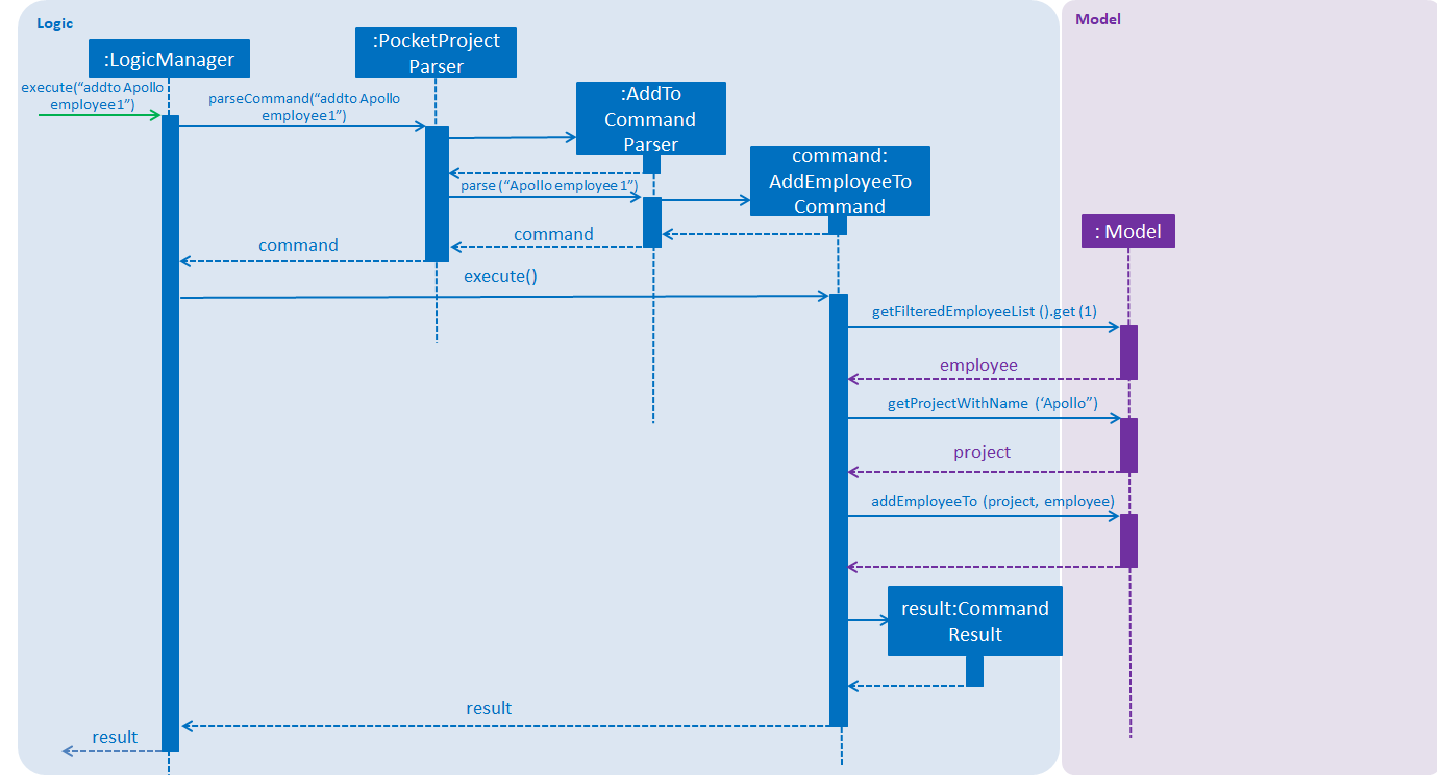
Refer to the sequence diagram above to better understand how the AddEmployeeTo Command
works. The diagram shows the sequence when a addto Apollo employee 1 is executed.
To simplify the explanation, the process can be summarized into the following key points:
1. The PocketProjectParser parses the string received and uses the addto keyword to identify that the input
is linked with the AddToCommand class.
2. The AddToCommandParser then identifies the type of AddToCommand that is being executed and the arguments involved.
3. The AddToCommandParser then creates the AddEmployeeToCommand/AddMilestoneToCommand object and this is passed on to the LogicManager for execution.
4. The command execution will check the validity of the arguments and then call the methods of the Model component to add the corresponding
employee/milestone to the project.
|
The main difference between the 2 commands is deciding the object to be added (Employee or Milestone) from model based on the user input. |
Design Considerations
Potential Design 1
The idea is to have only 1 parser ,PocketProjectParser, which receives and parses the whole input string
before constructing the relevant command.
Potential Design 2 (Selected Implementation)
The idea is to have a total of 2 parsers where the first parser, PocketProjectParser identifies the addto key word
and the rest of the input string is then parsed by the corresponding second parser, AddToCommandParser.
The 2nd design was chosen as there is better abstraction of the details and it also allows further functionality
to be add on top of the implemented parser. If future developers want to add more objects to the project, they can simply
make use of this AddToCommandParser to handle different inputs. Choosing this design was a good choice as it helped with the
implementation of adding user stories and project tasks to a project after this was initially constructed.
These sections are not exhaustive of my contributions and the rest can be viewed at Pocket Project: Developer Guide

